15 Updo Hairstyles Older Women That Look Elegant
Elegant hair does not have to mean complicated styling or uncomfortable pins. Updo hairstyles older women can wear with confidence can be polished, comfortable, and beautifully modern.
Finding the right updo can be challenging when hair becomes finer, shorter, more textured, or simply harder to manage than it once was. The goal is not to force your hair into an elaborate shape. It is to choose a style that works with your natural texture, length, and daily comfort while still giving you that special, finished feeling. This collection brings together elegant updo ideas with different shapes, textures, and finishing details, from softly tucked styles to creative twists and decorative accents. In my experience, small adjustments in placement and texture can completely change how an updo looks and feels. As you explore these ideas, you’ll find practical inspiration for weddings, dinners, celebrations, and everyday polished moments.
Pearl-Wrapped Low Twist
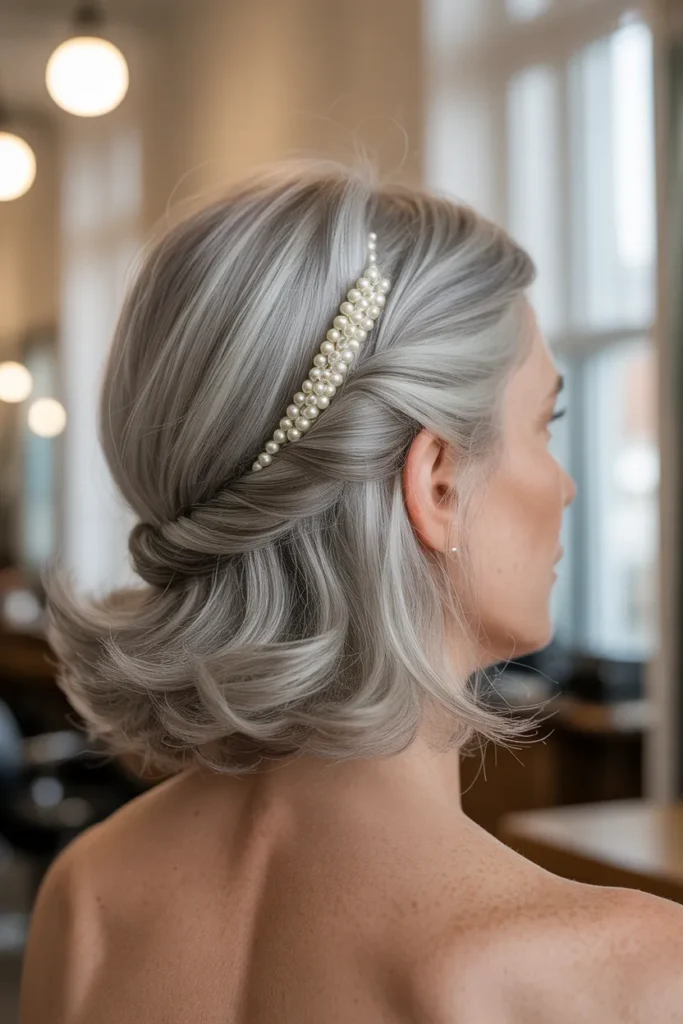
- A softly twisted low updo creates an instantly polished silhouette without looking overly formal.
- Pearl pins add a refined detail that works beautifully for celebrations or dinner events.
- The low placement feels comfortable and secure for longer wear.
- Natural silver, gray, or highlighted strands can show through the twist beautifully.
- This style works especially well when you want elegance without excessive volume.
- A few softly released strands around the face can keep the finish relaxed and flattering.
The magic of this updo is how effortlessly polished it looks without feeling stiff or overdone. The hair is gathered low at the nape, then gently twisted into a compact shape that keeps the silhouette graceful and neat. Pearl pins woven through the twist add a subtle glow while giving the style a special-occasion finish. In my experience, low placements can be especially comfortable for older women because they avoid the heavy, lifted feeling of some elaborate updos. A few wispy pieces near the temples can soften the overall shape. The result looks refined enough for weddings, anniversary dinners, family celebrations, or any evening when you want your hair to feel beautifully intentional.
This style is also practical when hair has become finer or more delicate with age. Instead of depending on dramatic volume, the twist creates visual interest through overlapping sections and gentle texture. I’ve noticed that silver and salt-and-pepper hair can make this kind of updo particularly striking because individual strands catch the light around the pearl accents. Start with lightweight styling mousse, create a low ponytail, twist small sections inward, and secure them with discreet pins. Avoid pulling everything extremely tight, especially around the hairline. The finished look should feel secure but comfortable. For daytime occasions, simple metallic pins can replace pearls for a quieter, more understated version.
Velvet Knot Chignon
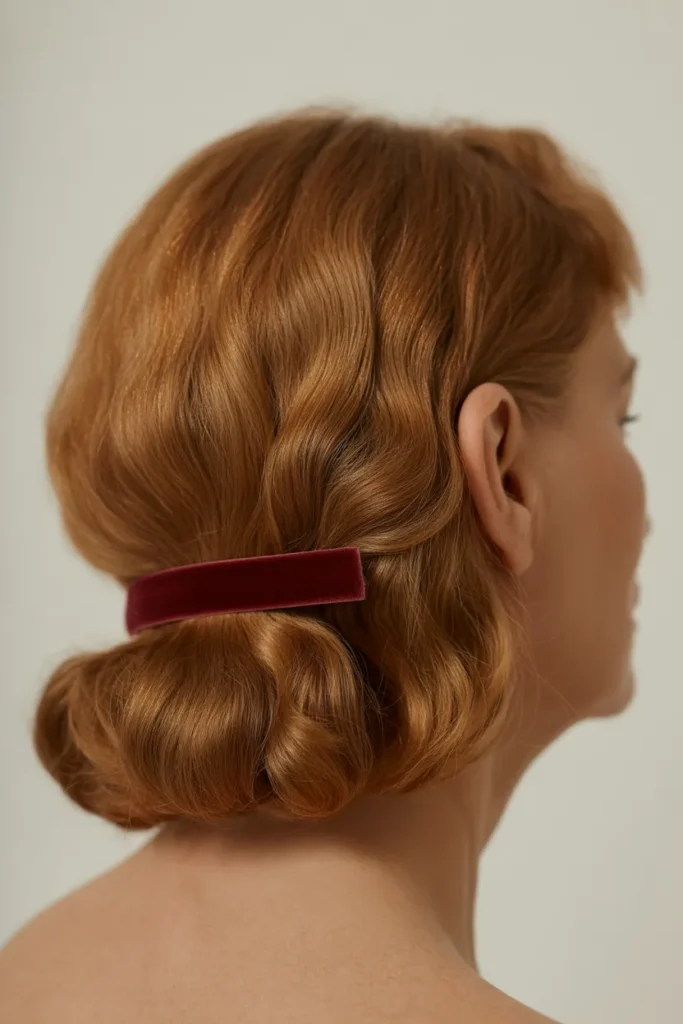
- A compact knot gives this updo a clean, sophisticated shape.
- Velvet ribbon introduces softness and visual contrast without overwhelming the hairstyle.
- The style can be adapted for medium or longer hair.
- A smooth crown keeps the overall appearance polished and controlled.
- Subtle face-framing strands make the finish feel more natural.
- It is an excellent choice for dinners, holiday gatherings, and formal daytime events.
A simple knot can become surprisingly elegant when the details are chosen carefully. This low chignon gathers the hair into a softly structured knot rather than a perfectly smooth bun, giving it dimension without making it look complicated. A narrow velvet ribbon tucked around the base adds a sophisticated seasonal touch and works beautifully for dinners or holiday gatherings. Stylists often recommend keeping the crown controlled while allowing the knot itself to retain a little texture. That balance prevents the style from appearing too severe. If your hair is medium length, the ends can be tucked underneath and secured with small pins. The result feels graceful, comfortable, and polished while remaining approachable for everyday styling.
The velvet detail can also be changed depending on the occasion and outfit. A neutral ribbon keeps the look understated, while a deeper tone creates a more noticeable accent. I’ve noticed that softly wavy hair often gives a knotted updo more body because the natural bends prevent the style from looking flat. Before gathering the hair, work a small amount of smoothing cream through the lengths and avoid brushing away every bit of natural texture. Secure the knot from underneath so the pins remain hidden. If short layers escape around the ears, leave one or two pieces loose rather than repeatedly tightening the style. That small adjustment can make the entire updo look softer and more natural.
Braided Crown Roll
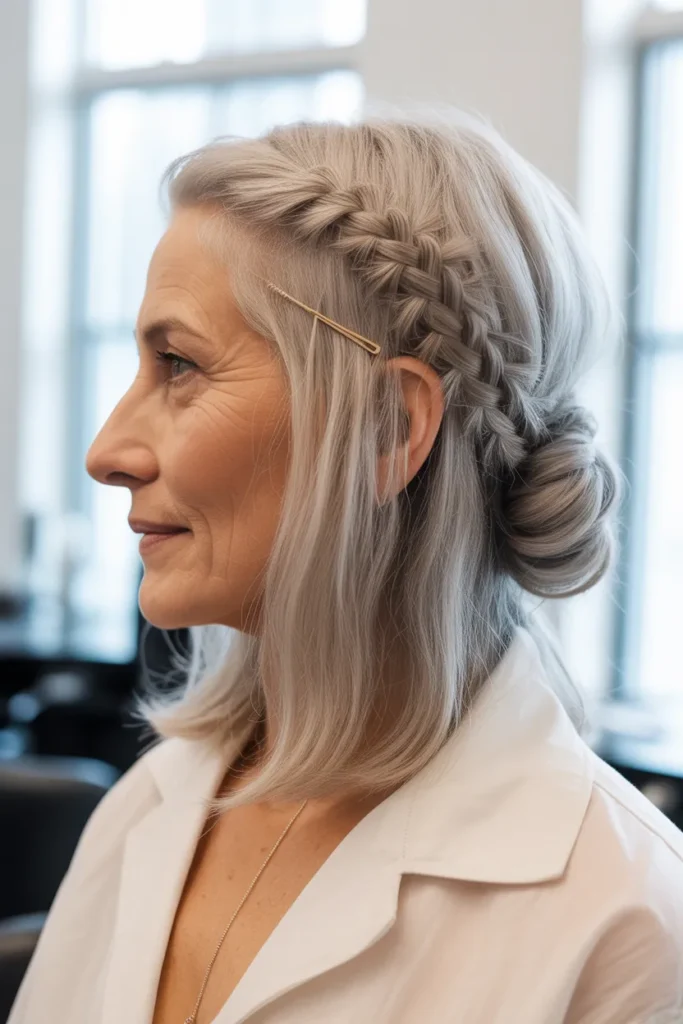
- A narrow braid creates an elegant frame around the top and sides of the head.
- The rolled-back length adds structure without requiring an oversized bun.
- Natural gray highlights can make the braided detail especially visible.
- The style keeps hair away from the face while maintaining softness.
- It suits garden parties, daytime weddings, and polished family occasions.
- A few loose strands can prevent the finish from looking overly formal.
A braided detail can completely change the character of a classic rolled updo. Here, a narrow braid begins near one temple and follows the crown before disappearing into the softly rolled length at the back. The braid gives the hairstyle a decorative finish while the low roll keeps the overall shape elegant and wearable. For older women with naturally straight or lightly textured hair, this approach can create dimension without relying on heavy teasing. In my experience, keeping the braid relatively slim makes the style look sophisticated rather than overly elaborate. It works beautifully for daytime weddings, garden celebrations, milestone birthdays, or occasions when you want something special that still feels comfortable and age-appropriate.
The technique is easier when the hair has a little grip before braiding. A light texturizing spray can help prevent slippery strands from falling apart, especially if the hair is fine. Divide a small section near the temple, create a simple three-strand braid, and secure it temporarily while the remaining hair is rolled into a low shape. Bring the braid across the crown and pin its end underneath the roll. I’ve noticed that leaving a tiny amount of softness around the temples makes this style more flattering than creating a completely tight finish. If your hair includes silver, white, or dimensional highlights, the braid can naturally catch different tones and make the entire updo appear more detailed.
Satin Loop Bun
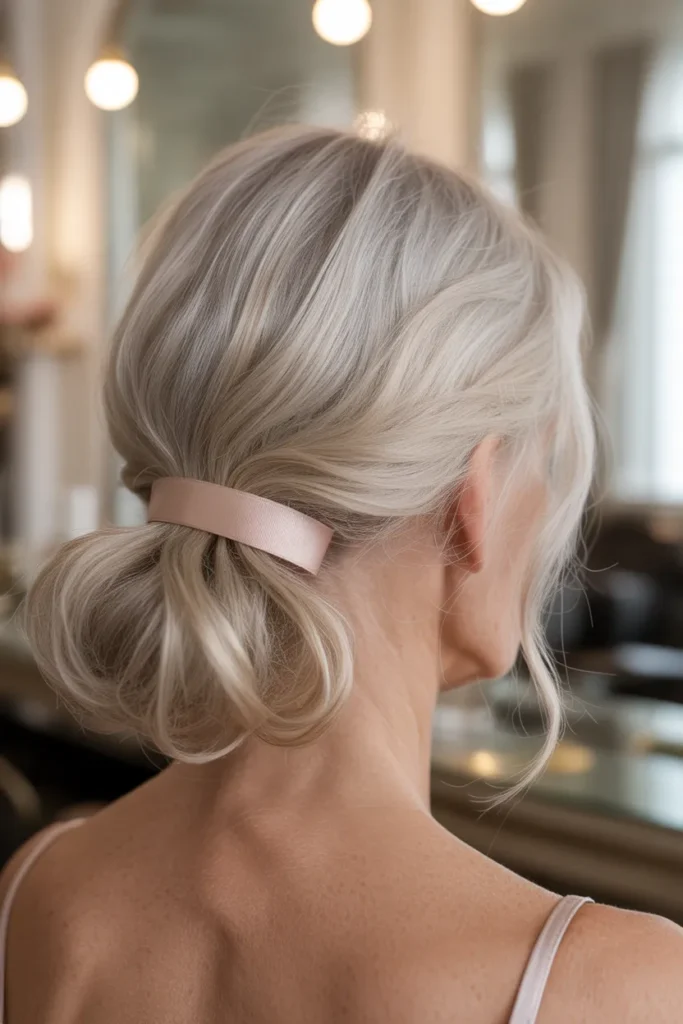
- A softly looped bun creates a refined shape without excessive height.
- Satin ribbon adds a smooth, elegant accent around the base.
- The style works beautifully with silver, blonde, brunette, or blended hair.
- A slightly relaxed finish keeps the updo comfortable and approachable.
- It suits evening dinners, celebrations, and polished daytime occasions.
- The compact shape is practical when you want hair securely off your neck.
A graceful loop can make a simple bun feel much more sophisticated. Instead of wrapping the hair tightly into a traditional round shape, the lengths are folded into soft overlapping loops that create subtle dimension at the nape. A narrow satin ribbon around the base adds polish without distracting from the natural hair texture. In my experience, this technique works particularly well when you want an elegant updo that does not depend on dramatic height or excessive teasing. The low position also keeps the neckline open, making it lovely with dresses, blouses, or statement earrings. It can easily transition from a family celebration to a restaurant dinner with only a small accessory change.
Fine hair can sometimes make traditional buns look smaller than expected, but looping the sections creates the illusion of fullness without adding bulky extensions. Start by applying a lightweight volumizing mousse through the lengths, then gather the hair loosely at the nape. Create two or three broad loops and secure each underneath with discreet pins. I’ve noticed that leaving the loops slightly imperfect often produces a more natural result than trying to make every section identical. If a few short strands escape, smooth them lightly with a small amount of styling cream. Keep the ribbon narrow and positioned close to the base so the finished look remains elegant rather than overly decorative.
Twisted Side Coil
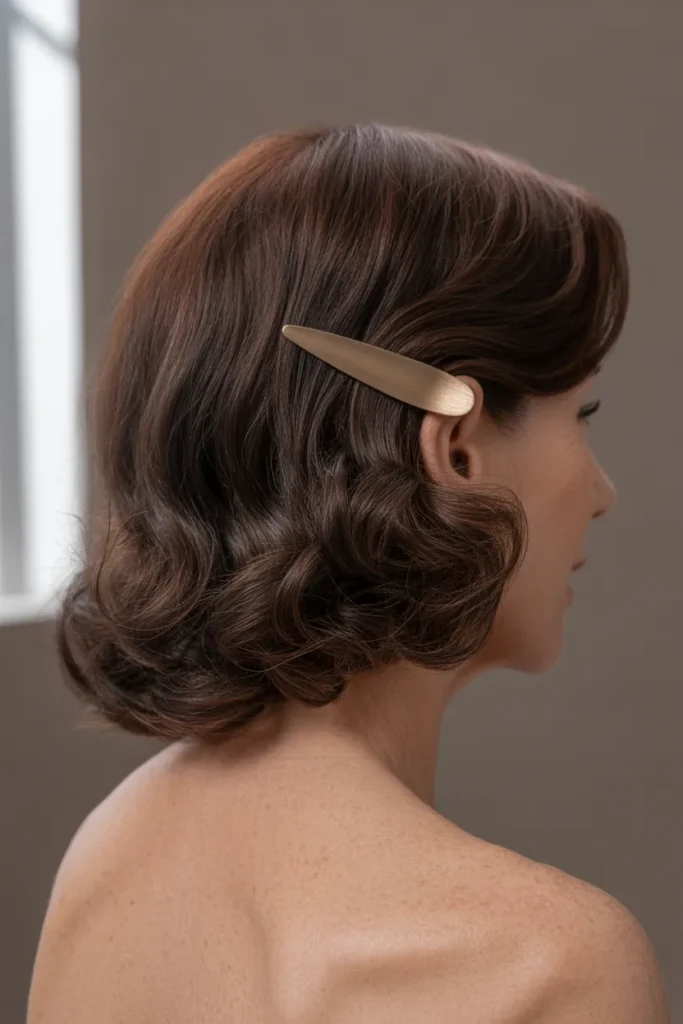
- A side-positioned coil creates an asymmetrical silhouette with graceful movement.
- Twisting the hair diagonally adds visual interest without complicated braiding.
- The style keeps the back of the head neat while highlighting the neckline.
- Natural texture can make the coil appear fuller and softer.
- A delicate metallic pin can provide a subtle finishing detail.
- It works especially well for dinners, receptions, and dressier daytime events.
An asymmetrical updo can look elegant while feeling far less predictable than a centered bun. This side coil begins with a gentle diagonal sweep and gathers the hair into a rounded twist positioned just below one side of the nape. The offset placement gives the hairstyle movement and makes the back silhouette especially interesting. Stylists often recommend this type of positioning when someone wants to draw attention toward the neckline or earrings without creating excessive volume at the crown. The finish can remain smooth for a formal event or slightly textured for a softer appearance. It is particularly lovely with boat-neck, V-neck, or one-shoulder outfits where the hairstyle can complement the clothing’s natural lines.
To create the coil, brush the hair gently toward one lower side and divide the gathered length into two sections. Twist them around each other, then coil the twisted length inward and secure it underneath with several pins. Avoid placing every pin in the same direction because varied angles usually provide better support. I’ve noticed that naturally wavy hair often holds this shape especially well, while very straight hair may benefit from a little texture spray beforehand. A small gold or silver pin can be added at the center once the shape feels secure. Keep the front relatively soft, with a few fine strands around the temples if desired.
Scarf-Tucked Updo
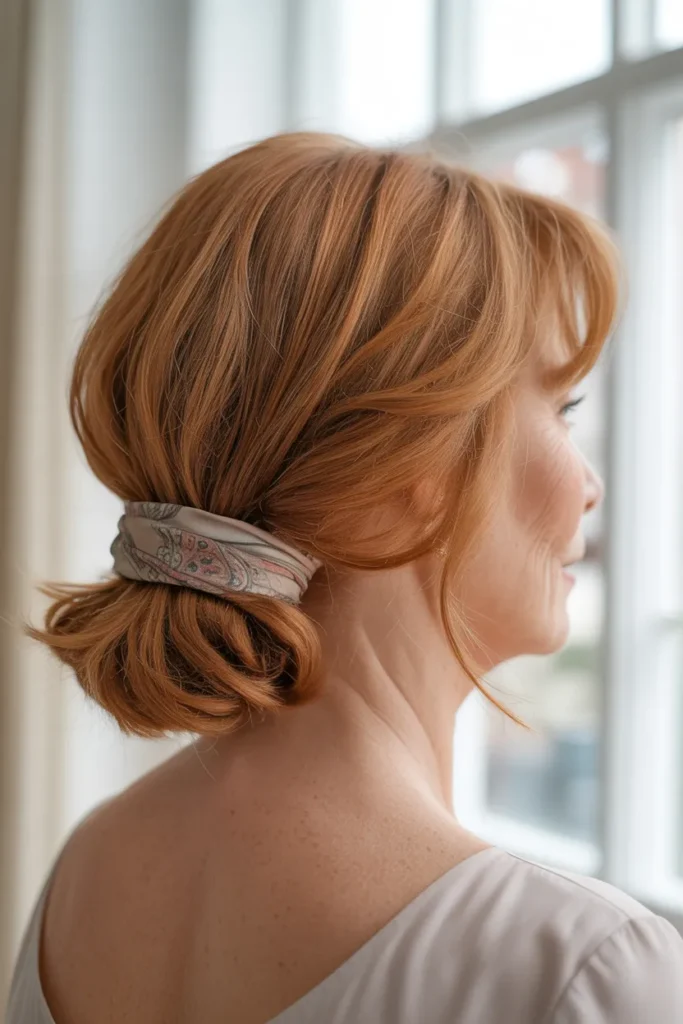
- A lightweight scarf creates color and personality around a classic gathered shape.
- Tucking the ends keeps the hairstyle neat and secure.
- The low placement makes the style comfortable for extended wear.
- Soft texture around the crown prevents a rigid appearance.
- It offers an easy way to coordinate hair with an outfit.
- The look works for brunches, travel days, lunches, and casual celebrations.
A small scarf can turn a practical gathered hairstyle into something instantly memorable. This low tucked updo keeps the hair comfortably contained while a slim silk scarf wraps around the base and adds a gentle pop of pattern. Rather than covering the entire hairstyle, the scarf acts as a finishing detail that frames the tucked shape. In my experience, this is especially useful on days when hair does not cooperate perfectly because the accessory can disguise uneven ends or small flyaways while still looking intentional. The style feels polished enough for lunch with friends but relaxed enough for travel, brunch, or a casual family gathering. It is also easy to adapt to different wardrobes.
Choose a lightweight scarf that will not pull heavily on the hair, particularly if your strands are fine. Gather the hair low at the nape, twist the length upward, and tuck the ends underneath before securing them with pins. Wrap the scarf around the base and tie it discreetly underneath or slightly to one side. I’ve noticed that scarves with subtle patterns tend to complement gray or silver hair beautifully without competing with it. For a softer finish, gently loosen the crown with your fingertips after everything is secured. This creates a little natural lift while keeping the tucked shape intact. A small amount of smoothing cream can finish the look without making the hair appear stiff.
Rosebud Pinwheel Updo
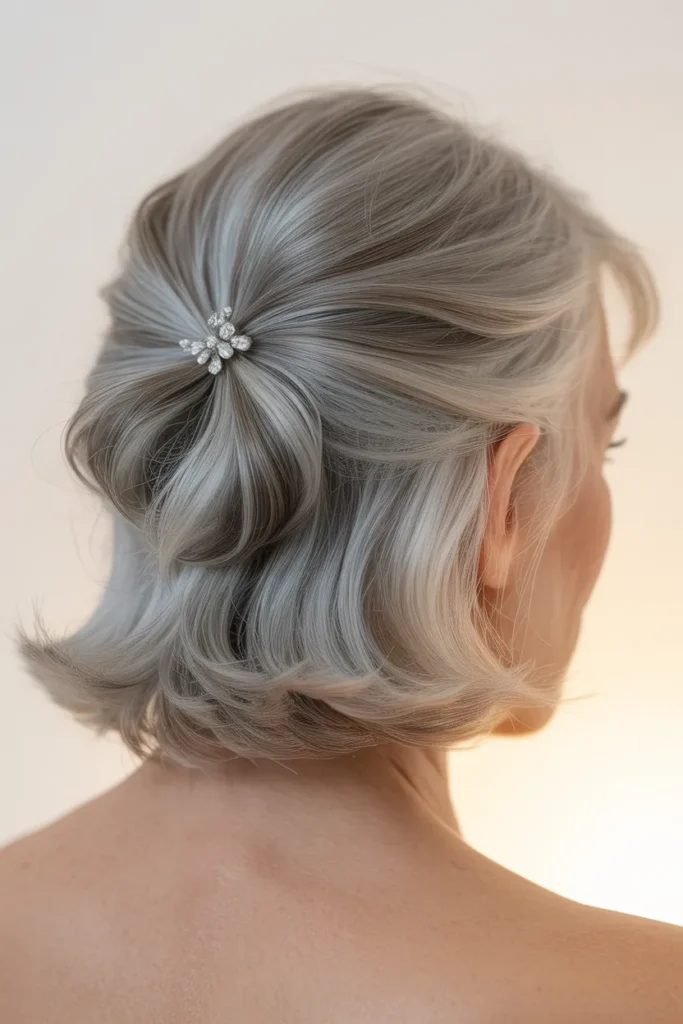
- Overlapping sections create a rounded, flower-like silhouette at the back.
- The design adds visual fullness without requiring excessive teasing.
- Natural silver and highlighted strands can emphasize each overlapping section.
- A compact shape keeps the style comfortable and easy to wear.
- It works beautifully for weddings, anniversaries, and elegant evening gatherings.
- A tiny decorative pin can accent the center without overwhelming the look.
A flower-inspired shape can make an updo feel artistic without becoming overly elaborate. This pinwheel design uses several broad sections that overlap around a central point, creating gentle movement and a softly rounded silhouette. Unlike a tightly sculpted bun, the sections remain visibly defined, which gives the back of the hairstyle more dimension. In my experience, this approach is especially flattering when fine hair needs visual fullness because the overlapping pieces create depth without relying on excessive backcombing. It is a lovely option for weddings, milestone celebrations, or formal dinners where you want the hairstyle to feel distinctive. A tiny crystal or pearl pin at the center can complete the design.
Preparation makes a noticeable difference with this style. Begin with dry hair that has a little texture, using a lightweight styling spray rather than a heavy product that can flatten fine strands. Divide the hair into several broad sections, twist each section gently, and curve it around the center before pinning it underneath. I’ve noticed that slightly varied section sizes make the finished shape look more natural than perfectly identical pieces. Avoid pulling the front too tightly; gentle softness around the temples keeps the overall appearance youthful and comfortable. Once the pinwheel is secured, lightly mist the back from a distance so the individual sections remain defined while the hairstyle stays touchable.
Curved Nape Sweep
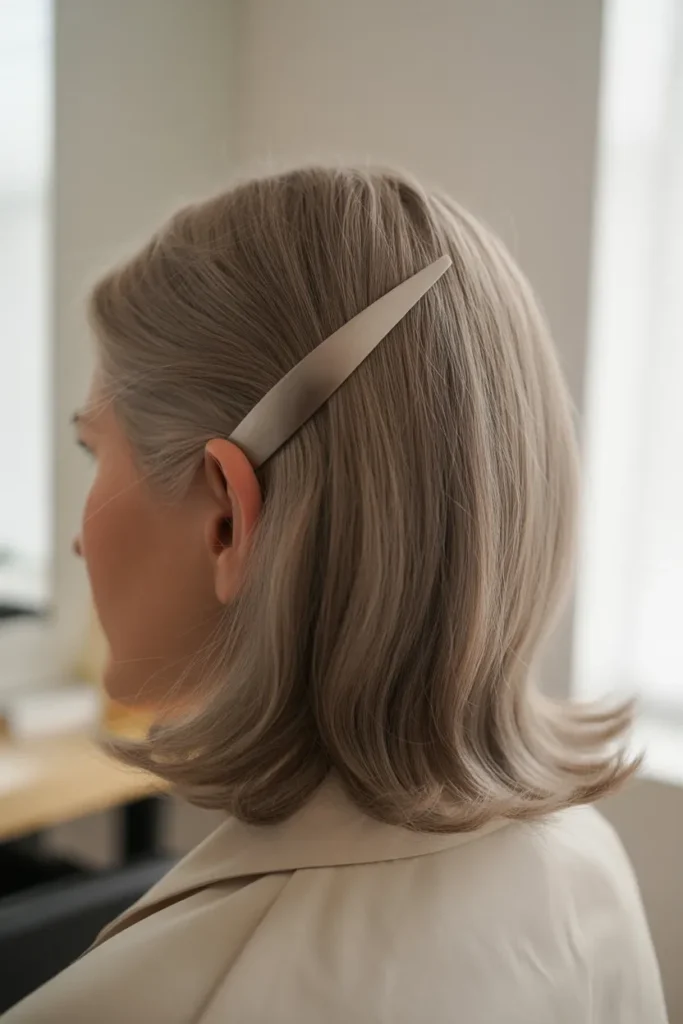
- A sweeping shape follows the natural curve of the neck for an elegant silhouette.
- The style keeps the crown smooth while allowing movement through the lengths.
- It works well with medium-length hair that cannot form a large bun.
- Soft bends can make straight or fine hair appear more dimensional.
- A minimalist barrette adds a polished finishing touch.
- The understated design is suitable for work, dinners, and special occasions.
The most elegant hairstyles are sometimes the ones that follow the natural shape of the head. This curved nape sweep gathers the hair low and slightly sideways, creating a smooth arc that rests neatly along the neck. Instead of building height, the design relies on direction and shape to make the hairstyle visually interesting. Stylists often recommend directional styling when someone wants a polished look without a large or heavy updo. The result is understated enough for the office but refined enough for dinner afterward. A slim barrette placed across the tucked section adds structure while keeping the overall appearance modern. The low profile also pairs beautifully with earrings and open-neck clothing.
To create this shape, begin by smoothing the hair with a lightweight cream and directing it toward one lower side. Twist the gathered length inward along the curve of the nape, then secure the ends underneath with crossed pins. I’ve noticed that working with the hair’s natural direction makes the style more comfortable and helps reduce the need for repeated adjustments throughout the day. If your hair is especially fine, gently tease only the underside of the gathered section before twisting. Keep the visible surface smooth rather than heavily backcombed. Once pinned, add a narrow barrette over the center for a clean finish. The hairstyle should feel secure while still retaining natural movement.
Laced Twist Bun
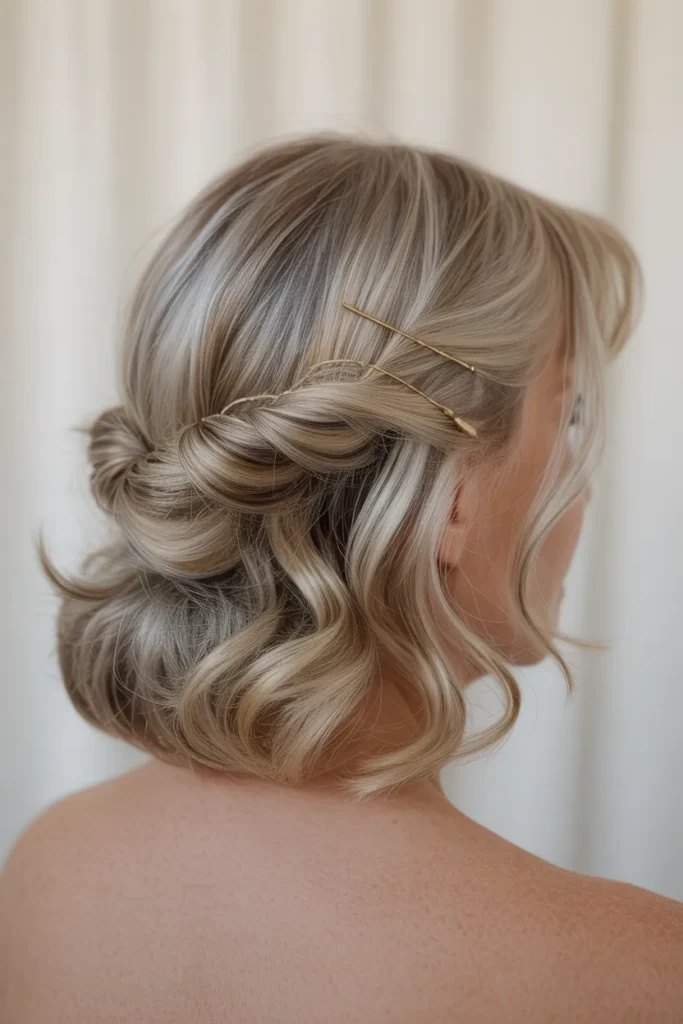
- A narrow lace-style twist adds delicate texture around a classic low bun.
- The design gives fine hair more visual detail without requiring extra bulk.
- The bun remains compact and comfortable at the lower nape.
- Subtle highlights become visible as the twisted sections overlap.
- It suits elegant daytime events as well as evening occasions.
- A few softened strands around the face keep the result approachable.
Delicate twisting gives this low bun a surprisingly detailed finish. The hair is divided into narrow sections that are gently crossed and woven around the base, creating a lace-like texture before disappearing into a compact bun. This adds interest without making the hairstyle look bulky or complicated. In my experience, fine or medium-density hair often benefits from this kind of surface detail because the eye sees multiple overlapping sections rather than one small mass of hair. The style is especially pretty for daytime weddings, anniversary lunches, formal gatherings, or an evening dinner. A few softly released strands near the face can keep the structured back from feeling too severe.
For better hold, begin with hair that has some natural grip rather than freshly conditioned, slippery strands. Apply a small amount of texturizing product through the lengths, then create several narrow twists and direct them toward the lower back of the head. Pin each section beneath the growing shape before forming the remaining ends into the bun. I’ve noticed that slightly loosening the outer edges after pinning gives the hairstyle a softer, more dimensional appearance. Avoid adding too much hairspray because it can make fine strands look rigid. Finish with a couple of discreet gold pins tucked into the twisted sections. They should support the style while remaining subtle enough to keep the hairstyle elegant.
Braided Halo Tuck
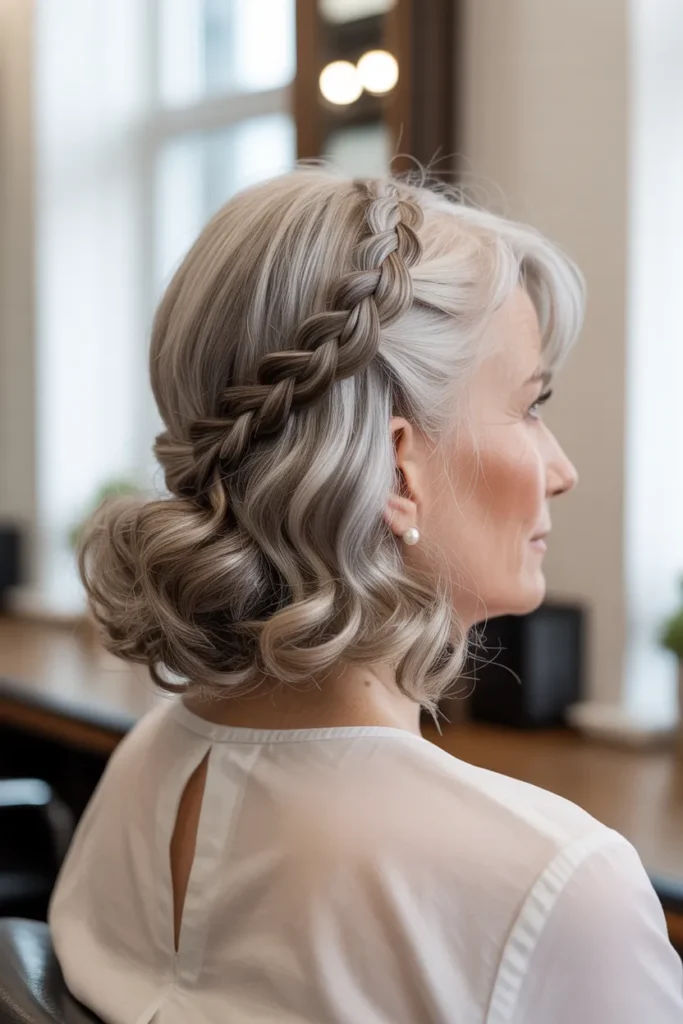
- A slim braid creates a graceful halo effect around the crown.
- The tucked length keeps the back neat without creating excessive height.
- Silver and salt-and-pepper tones can make the braid especially dimensional.
- The style keeps longer front sections comfortably away from the face.
- It works beautifully for daytime celebrations, lunches, and intimate weddings.
- A relaxed finish keeps the look sophisticated without feeling overly formal.
A slim braided halo can give a low updo an entirely new silhouette. Instead of placing all the detail at the back, this design brings a narrow braid around the upper head before guiding the remaining hair into a tucked shape below. The result frames the face gently while keeping the overall hairstyle neat and elegant. Stylists often recommend keeping the braid narrow when working with finer hair because a lighter braid preserves a delicate appearance and does not overpower the face. This look feels appropriate for a garden wedding, family luncheon, anniversary celebration, or dressy daytime gathering. It also photographs beautifully because the braid creates a clear visual line around the crown.
Start by separating a slim section near one temple and braid it loosely toward the opposite side, following the curve of the head. Gather the remaining hair low at the nape, twist it upward, and tuck the ends underneath. I’ve noticed that leaving the braid slightly relaxed gives it more texture and prevents the hairstyle from looking overly tight. Secure the halo with small pins hidden beneath the surrounding hair, then pin the tucked section from underneath. If you have silver strands, avoid coating them heavily with shine products because their natural variation can provide beautiful dimension. Finish with a light mist of flexible hairspray so the braid and tucked shape stay comfortable throughout the day.
Soft Fan Bun
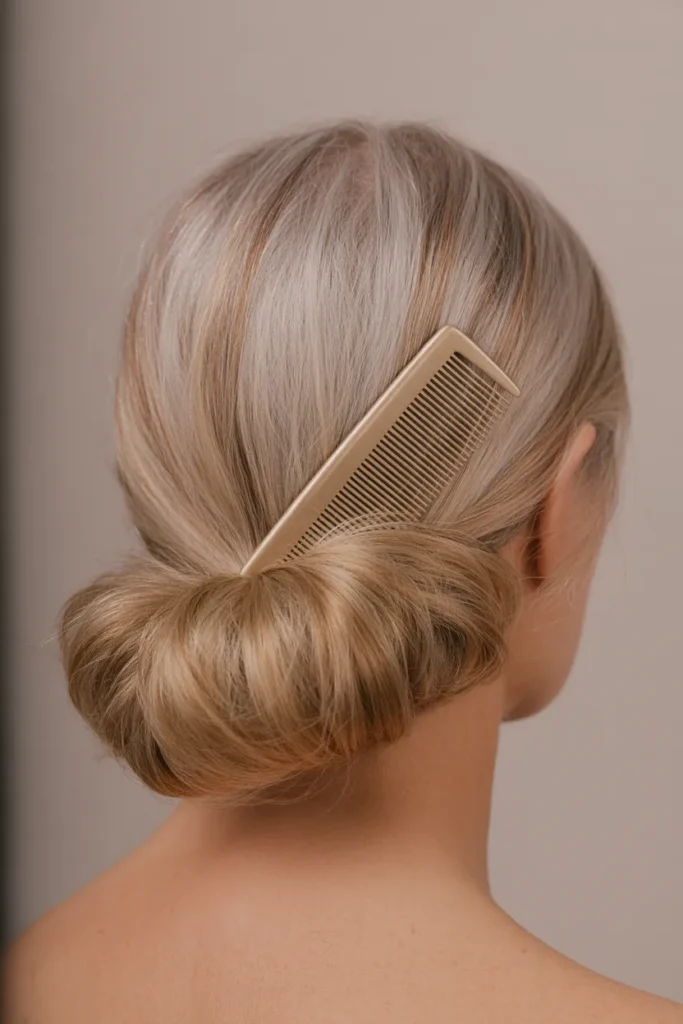
- A fan-shaped bun creates width rather than excessive height.
- The open shape can make fine or medium-density hair appear fuller.
- Softly separated sections add movement and texture.
- The low placement keeps the hairstyle comfortable for extended wear.
- It pairs beautifully with earrings and elegant necklines.
- The design works for weddings, dinner parties, and special family occasions.
A wider bun can create the illusion of fullness without piling the hair high on the head. This soft fan shape spreads the gathered sections gently across the lower back of the head, creating a graceful horizontal silhouette. Instead of forming one compact round bun, the hair is divided into overlapping pieces that open slightly like a fan. In my experience, this approach can be especially useful when someone wants an elegant updo but prefers to avoid exaggerated crown volume. The wider shape also complements statement earrings and open necklines beautifully. It is sophisticated enough for a formal dinner yet soft enough for a family celebration or milestone birthday.
To build the shape, gather the hair low and divide the length into three or four broad sections. Twist each section lightly, then arrange the pieces beside one another rather than stacking them directly on top. Secure each section underneath with small pins, keeping the outer edges slightly loose. I’ve noticed that fine hair looks more substantial when the sections remain separated instead of being compressed into one tight bundle. A lightweight volumizing spray can provide grip before styling, while a flexible hairspray helps preserve the fan shape afterward. If desired, place a small metallic comb at one side. Keep the accessory delicate so the hairstyle remains the main focus.
Double Twist Fold
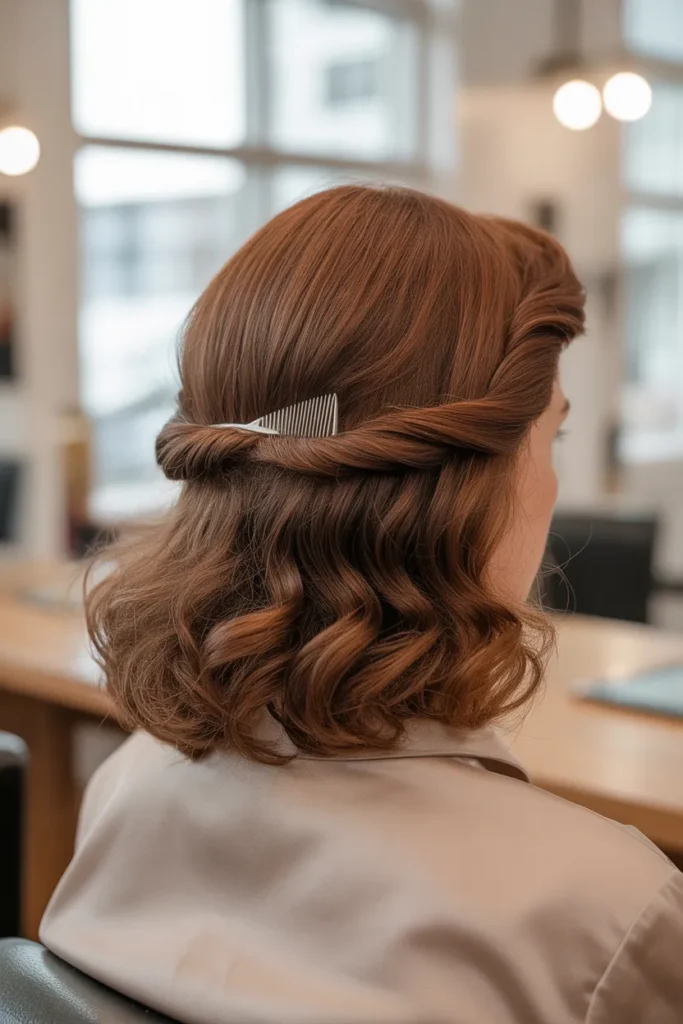
- Two opposing twists create a balanced and symmetrical back view.
- Folding the lengths underneath keeps the finish sleek and contained.
- The design works especially well for medium-length hair.
- Natural texture can add softness between the twisted sections.
- A simple pin or comb provides an understated finishing detail.
- It transitions easily from polished daytime wear to evening occasions.
Two simple twists can create a remarkably balanced and elegant updo. This design begins with opposite sections that twist inward toward the center, where the remaining lengths are folded underneath to form a neat low shape. The symmetry makes the hairstyle look carefully finished, while the gentle texture keeps it from appearing rigid. Stylists often recommend this type of construction for medium-length hair because it creates a secure shape without requiring enough length for a large bun. It is a versatile option for work events, family celebrations, dinners, or daytime ceremonies. The clean center also leaves plenty of room for a delicate comb or small decorative pin.
For a smoother result, apply a small amount of styling cream through the lengths before separating the hair into two sections. Twist each side inward, keeping the tension comfortable around the scalp, then overlap the ends at the center and fold them underneath. I’ve noticed that securing each twist separately before hiding the ends makes the hairstyle much more stable. Use several small pins rather than one large pin so the weight is distributed evenly. If your hair has natural waves, allow some of that texture to remain visible instead of brushing it completely flat. Finish with flexible hairspray and gently check the nape for loose strands before heading out.
Ribboned French Fold
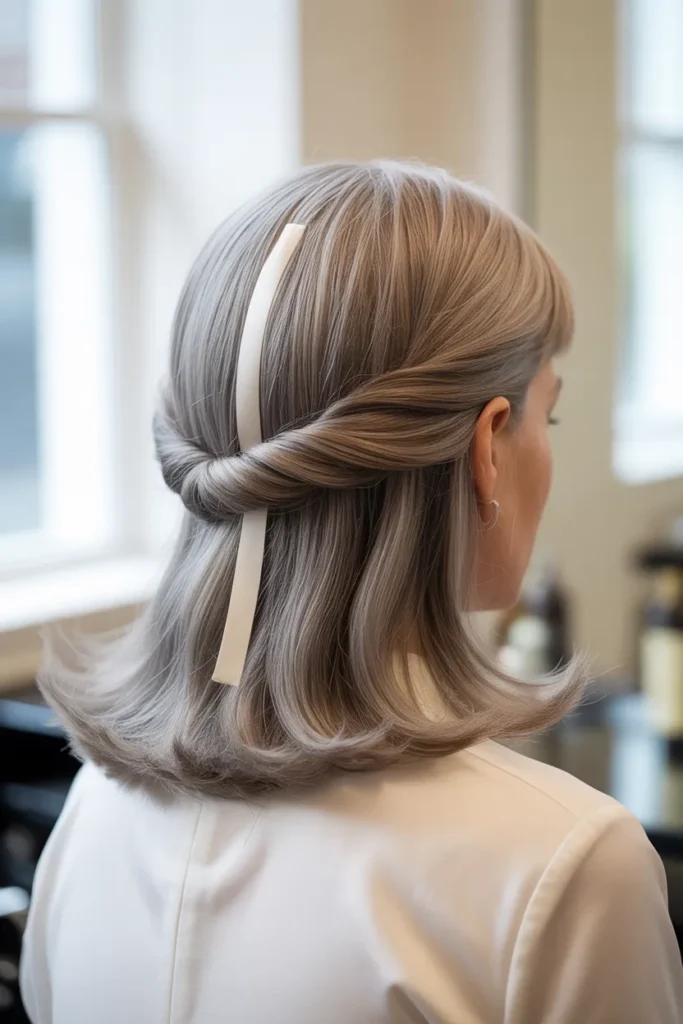
- A softly folded French-style shape creates a timeless, elongated silhouette.
- A narrow ribbon adds a feminine detail without overwhelming the hairstyle.
- The vertical shape works beautifully with medium-length hair.
- Natural gray, silver, or brunette tones remain visible through the fold.
- It keeps the neckline open and the hair comfortably contained.
- It suits weddings, elegant lunches, receptions, and evening gatherings.
A vertical fold can give medium-length hair an elegant shape without demanding a large amount of volume. This design gently sweeps the hair upward and folds the lengths inward, creating a clean silhouette that looks polished from every angle. A narrow ribbon tucked along one side adds a delicate accent while keeping the hairstyle sophisticated. In my experience, this type of updo is particularly useful when someone wants something formal but does not want a bulky bun. The elongated shape pairs naturally with earrings, scarves, and dresses with open necklines. It is a beautiful choice for weddings, receptions, anniversary dinners, or any occasion where understated elegance feels right.
The technique works best when the hair has enough grip to hold the fold securely. Apply a lightweight texturizing spray through the lengths, sweep everything toward the back, and begin rolling the hair inward from the ends. Secure the fold vertically with several discreet pins placed underneath the outer layer. I’ve noticed that using multiple smaller pins creates better support than relying on one heavy clip. Keep the surface smooth but not completely flat so the hairstyle retains some natural movement. If shorter strands appear around the temples, leave them softly relaxed rather than pulling them into the fold. Finish with flexible hairspray, then gently check that the ribbon remains flat and comfortable.
Pearl Accent Tuck
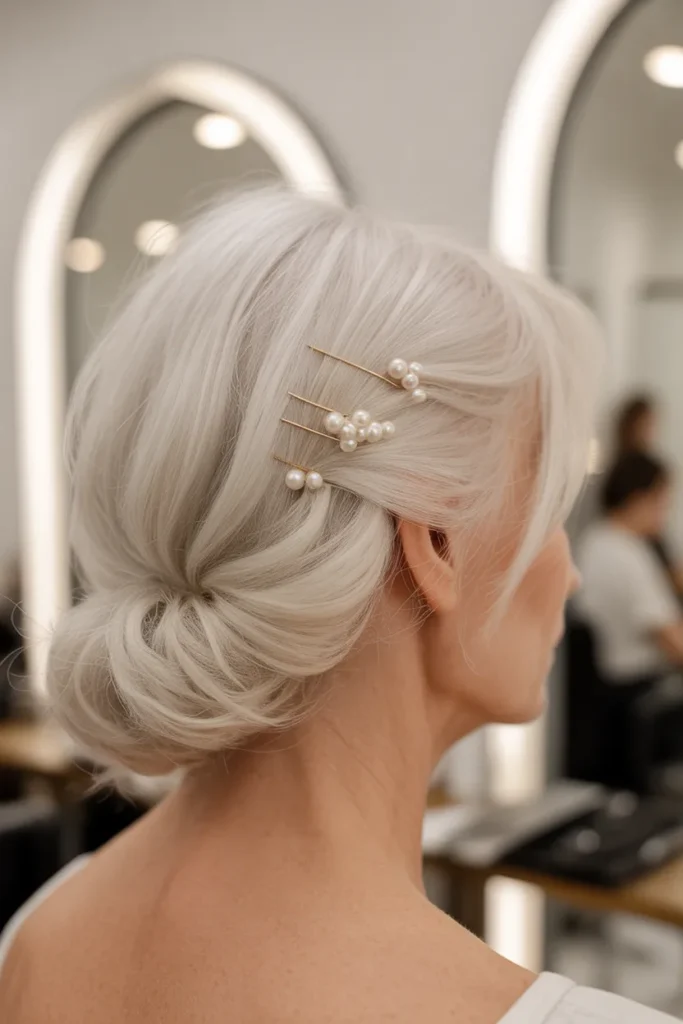
- A low tucked shape keeps the hairstyle elegant and comfortably contained.
- Small pearl accents create a refined focal point without excessive decoration.
- The style works beautifully with silver and salt-and-pepper hair.
- Soft volume at the crown adds dimension while preserving a natural silhouette.
- It is suitable for weddings, formal lunches, and anniversary celebrations.
- The tucked construction makes the look practical for longer wear.
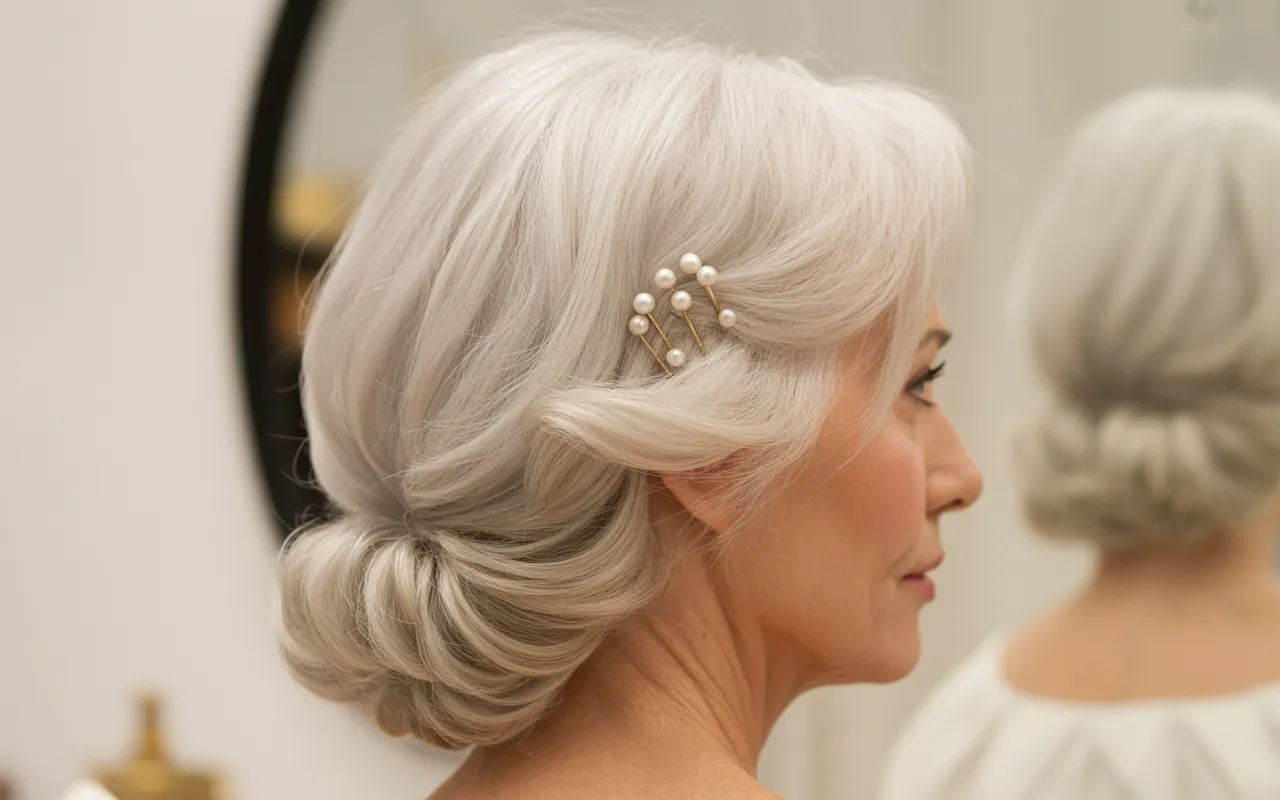
Sometimes three tiny details can make a simple updo look beautifully finished. This low tucked style gathers the hair gently at the nape while creating a touch of lift through the crown. Instead of relying on a complicated structure, the design gets its elegance from the clean tucked shape and three small pearl accents arranged slightly off-center. In my experience, asymmetrical accessories often make classic hairstyles feel more current because they introduce interest without adding visual clutter. The style works particularly well for older women attending weddings, anniversary dinners, formal lunches, or family celebrations. It also gives silver and white hair a lovely opportunity to catch and reflect soft light.
Begin with a lightweight volumizing product at the roots, then gently smooth the surface without flattening the crown completely. Gather the hair low, twist the length upward, and tuck the ends beneath the gathered section. Secure the shape with several pins placed from different directions. I’ve noticed that fine hair holds better when the pins cross each other rather than sitting parallel. Once the updo feels secure, place the pearl pins at slightly different heights to create a natural arrangement. Avoid excessive hairspray because a flexible finish keeps the hair looking more realistic. If desired, pull out two very fine strands near the temples for softness, then lightly smooth them with your fingertips.
Textured Crescent Bun
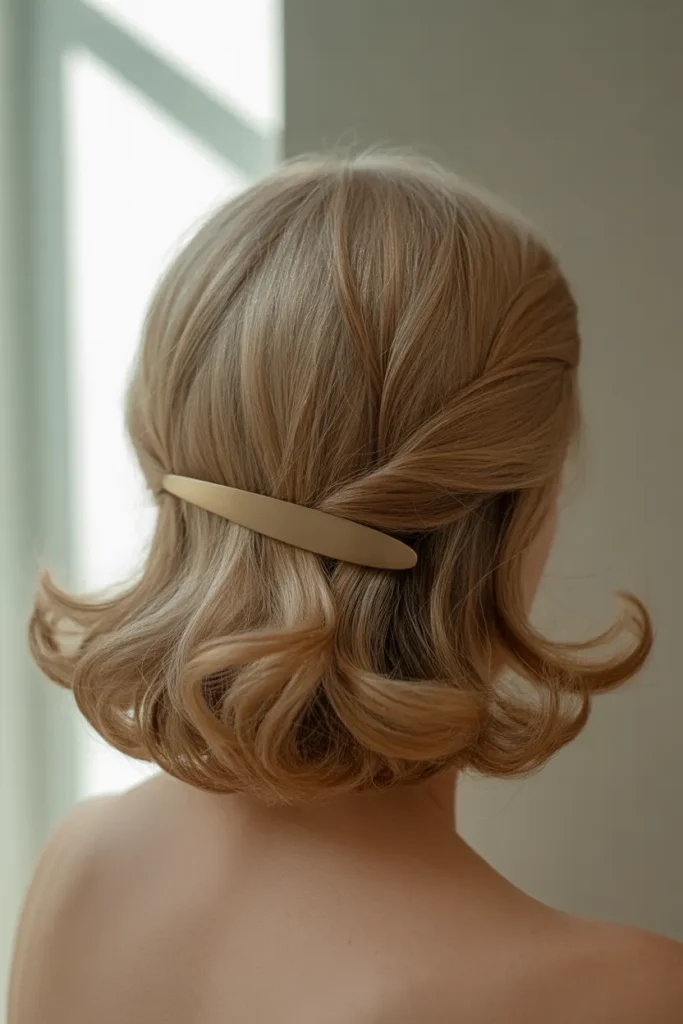
- A crescent-shaped bun creates an unusual but elegant curved silhouette.
- Gentle texture gives the hairstyle more dimension and movement.
- The low placement keeps the design comfortable and wearable.
- It works particularly well with naturally wavy or lightly textured hair.
- Subtle highlights can emphasize the curved shape beautifully.
- A minimalist metallic accent can finish the style without overpowering it.
A curved silhouette can make a familiar low bun feel completely fresh. Instead of forming a traditional circular bun, this design sweeps the hair into a crescent-like curve across the lower back of the head. The unusual shape creates movement while keeping the overall finish refined and understated. In my experience, naturally wavy hair works especially well here because its bends help the crescent hold a soft, dimensional form. The style is ideal for women who prefer elegant updos that do not look overly structured. It pairs beautifully with simple dresses, tailored outfits, or statement earrings and can transition from an afternoon celebration to an evening dinner with ease.
To create the crescent, gather the hair low and slightly toward one side, then twist the length while guiding it horizontally across the nape. Curve the twisted section inward and secure it underneath at several points to preserve the arc. I’ve noticed that the shape looks more natural when the outer edge remains slightly relaxed instead of being pulled completely tight. A small amount of texturizing spray can improve grip, especially on fine or freshly washed hair. Once the crescent is secured, use a few discreet pins to control the ends and add a slim metallic accent if desired. Finish with flexible hairspray, focusing on the structure rather than coating the entire hairstyle heavily.
Conclusion
The right hairstyle can make you feel instantly more polished without making you feel unlike yourself. These updo hairstyles older women can adapt to different hair textures, lengths, occasions, and comfort preferences, giving you plenty of ways to create an elegant finish.
Whether you prefer soft twists, tucked shapes, decorative details, or structured designs, there is inspiration here to make your next hairstyle feel fresh and special. I’ve seen how thoughtful styling can transform not only the hair but also the way someone carries themselves. Start with the idea that feels most natural to you, adjust it for your hair, and make it your own. Save this article on Pinterest, try a favorite style, and share it with someone looking for beautiful new inspiration.