15 Braided Hairstyles for Gray Hair Over 50 Stylish
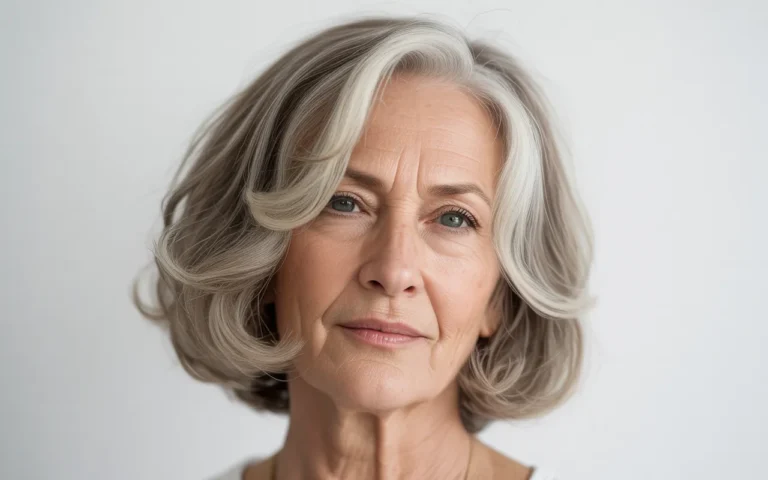
Gray hair can look absolutely stunning when the right braid brings out every beautiful silver strand.
Ready for fresh ideas that feel stylish, practical, and easy to wear?
These braided hairstyles for gray hair over 50 are designed for women who want more than a basic braid. Natural gray hair can have a beautiful mix of silver, white, charcoal, and darker tones, but choosing a hairstyle that shows those shades while keeping the hair comfortable and manageable can sometimes feel challenging. The right braid can add texture, shape, dimension, and a polished finish without hiding your natural color. You’ll find ideas for different lengths, textures, occasions, and styling preferences, from relaxed everyday braids to elegant updos. In my experience, small adjustments such as loosening a braid, leaving a few face-framing strands, or adding a simple accessory can completely change the finished look. These ideas are meant to help you find a style that feels beautiful and genuinely wearable.
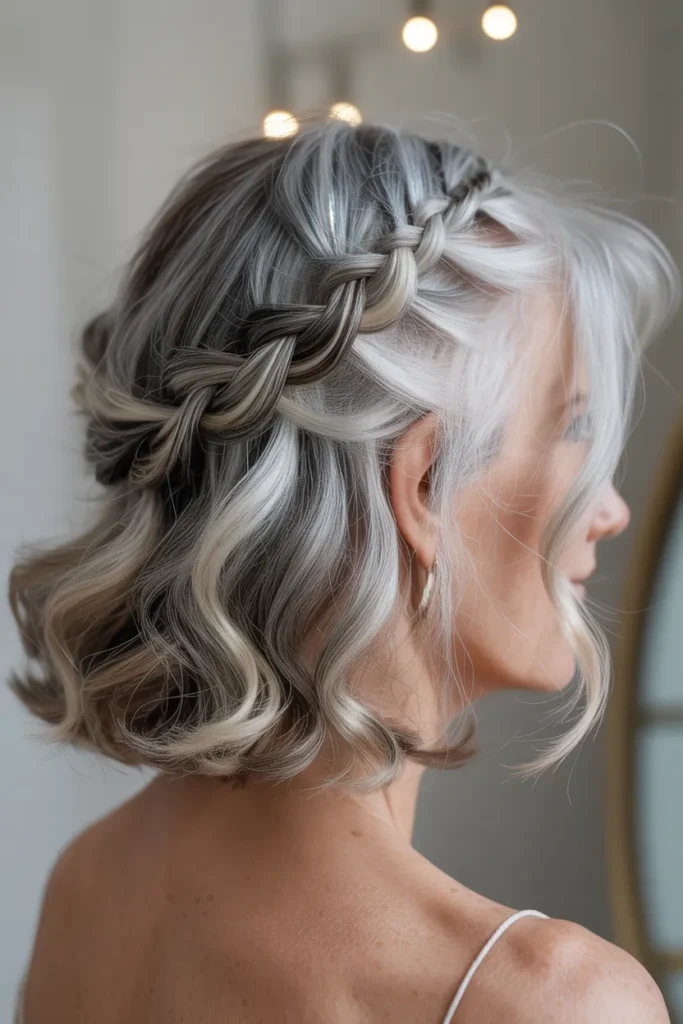
Silver Side Cascade
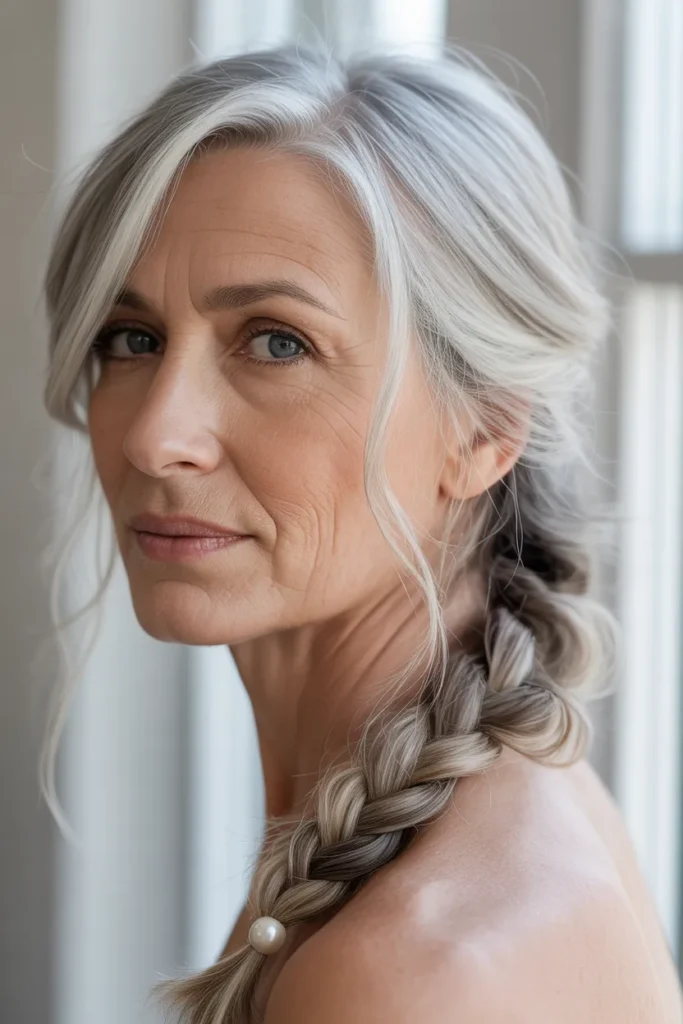
- Soft side placement creates a graceful frame around the face.
- Loose braiding lets natural silver and white tones show beautifully.
- A few wispy pieces keep the finish relaxed and youthful.
- The style works well for medium or longer hair.
- Gentle texture adds visual fullness without making the braid heavy.
- A small pearl pin can create a polished finishing touch.
A soft side braid can instantly turn silver strands into a polished statement without making the style feel overly formal. This loose design begins near one temple and follows the hairline before joining the rest of the length in a relaxed three-strand braid. The slightly undone finish lets natural gray, silver, and white tones show through beautifully, creating depth without extra color. It works especially well for medium or long hair when you want something secure yet comfortable. I’ve noticed that leaving a few fine pieces around the face makes the braid look more natural and soft. Wear it for brunch, family gatherings, casual celebrations, or an elegant daytime event.
The beauty of this style is how easily it balances neatness with movement. Start with dry hair and add a light texturizing product through the lengths so the braid grips without looking stiff. Keep the braid moderately loose, then gently widen a few sections with your fingertips for a fuller appearance. For naturally fine silver hair, this technique can create the impression of more dimension while keeping the finish lightweight. In my experience, a small pearl or matte metallic pin placed near the braid’s beginning adds interest without overpowering the hair. The style also transitions beautifully from daytime errands to dinner, making it a practical choice when you want polished hair without constant touch-ups.
Halo Nape Braid
- The curved braid creates an elegant shape around the back of the head.
- Silver and charcoal strands naturally emphasize the braided pattern.
- A tucked nape keeps the style neat without looking overly formal.
- It is practical for shoulder-length hair that resists traditional updos.
- Softly loosened sections create a comfortable, modern finish.
- Minimal pins keep the design secure throughout busy occasions.
A crown braid with a low tucked finish gives gray hair a graceful shape while keeping the overall look comfortable and wearable. The braid begins along one side, travels around the back of the head, and finishes near the opposite nape, where the end is discreetly tucked beneath the braided section. Silver and charcoal strands create natural contrast as the braid curves around the head. This is especially useful for medium-length hair that does not always stay in a traditional updo. Stylists often recommend slightly loosening the crown after securing it because the added softness prevents the style from looking too rigid. It suits garden parties, lunches, celebrations, and polished everyday outfits.
This style is a smart option when you want your hair controlled without hiding its natural gray pattern. Apply a small amount of smoothing cream before braiding, concentrating on flyaways around the crown and temples. Keep the braid close to the head but avoid pulling tightly, especially around the hairline. A few visible silver wisps can make the finished shape look intentionally relaxed rather than unfinished. I’ve noticed that this approach photographs particularly well from a three-quarter angle because the braid creates a clear frame around the head. Finish with two or three discreet pins underneath the tucked section, then leave the rest of the hair natural and touchable for a refined, low-maintenance result.
Twin Braid Low Knot
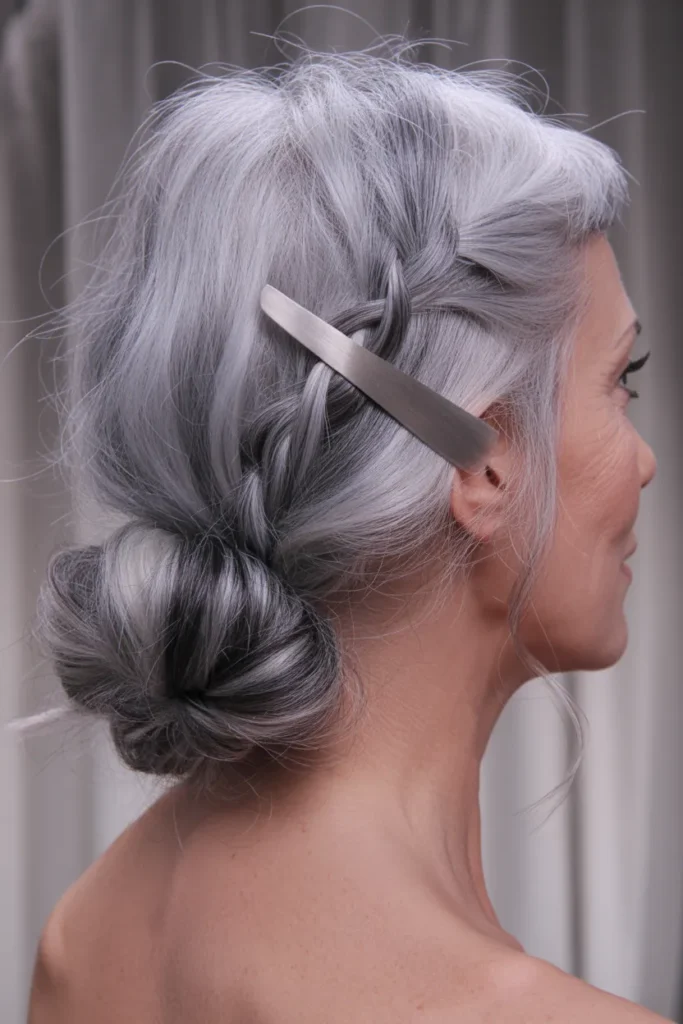
- Two slim braids create delicate detail around the face.
- The low knot keeps longer gray hair controlled and comfortable.
- Mixed silver tones make each braided section visually dimensional.
- The slightly imperfect knot feels softer than a tightly sculpted bun.
- A brushed-metal barrette adds a subtle contemporary accent.
- This design works especially well for formal daytime or evening events.
A braided low knot brings together texture, shape, and understated elegance in one easy style. Create two narrow braids from the front sections, guide them toward the nape, and combine them with the remaining hair into a compact low knot. The overlapping braids add detail without making the hairstyle feel busy, while gray and silver strands catch the light along every twist. This design works beautifully on shoulder-length or longer hair, especially when you want a secure style that still looks sophisticated. I’ve noticed that keeping the knot slightly imperfect gives mature hair a softer appearance than a tightly sculpted bun. It is ideal for dinners, ceremonies, office events, and special family occasions.
For a dependable finish, begin by brushing the hair gently and creating clean front sections before braiding. Use small clear elastics to secure the braids, then pin the knot from underneath so the surface stays smooth. If your hair has mixed silver and darker tones, avoid flattening every strand; natural variation makes the braided texture more noticeable and dimensional. A simple brushed-metal barrette placed above the knot can add a modern accent without competing with the gray tones. Stylists often recommend working with the hair’s natural texture rather than forcing it completely straight first. That makes this style faster to create and helps it hold its shape comfortably throughout a long event.
Silver Ribbon Braid
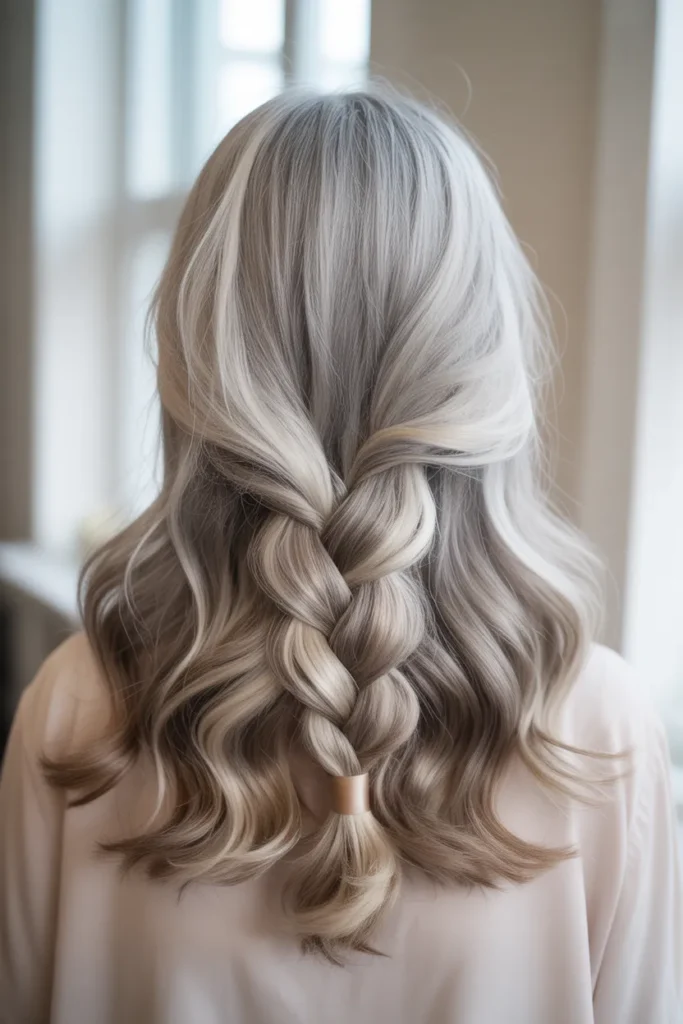
- A central braid creates a clean, balanced silhouette.
- Naturally silver strands make the woven texture stand out.
- The ribbon adds subtle color without requiring hair dye.
- A loose finish keeps the style soft and approachable.
- It works beautifully with medium-to-long straight or wavy hair.
- Ideal for lunches, celebrations, and relaxed weekend gatherings.
A simple ribbon woven through a braid can make naturally silver hair feel instantly refreshed and special. This style starts with a relaxed central braid that follows the natural fall of the hair, while a narrow ribbon is threaded through selected sections for a subtle decorative effect. The contrast between cool silver strands and a warm neutral ribbon creates beautiful visual dimension without overwhelming the hairstyle. Keep the braid slightly loose so the individual gray tones remain visible instead of blending into one solid shade. In my experience, this is an especially useful option when you want something prettier than a basic braid but still easy enough for a casual afternoon, family gathering, or weekend celebration.
The key is choosing a ribbon that complements rather than competes with your natural color. Champagne, taupe, soft ivory, or muted gray can work beautifully with silver hair. Begin by dividing the hair evenly and secure the ribbon discreetly at the braid’s starting point. Braid gently, keeping consistent tension through each section, then loosen the outer edges slightly for a softer silhouette. If your hair is fine, a little dry texture spray can improve grip and prevent the ribbon from sliding. I’ve noticed that leaving a few natural strands around the face makes the finished look more relaxed. Finish with a small elastic hidden beneath the braid for a clean, comfortable result.
Braided Low Ponytail
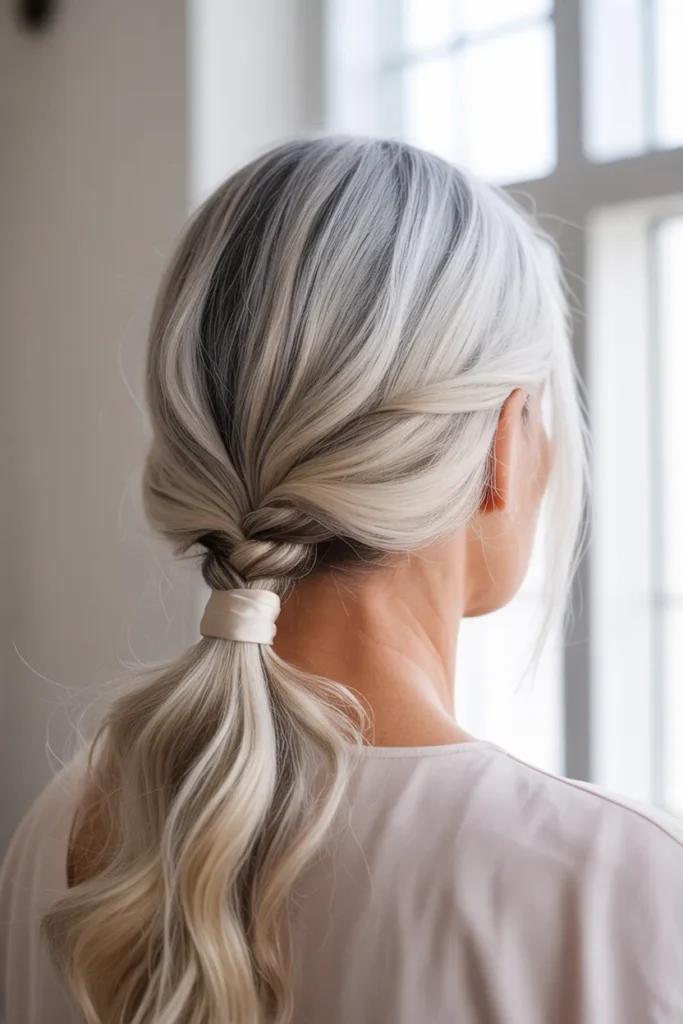
- The braid gives a classic ponytail a more detailed finish.
- Natural silver and white strands add depth to the woven sections.
- A low placement feels comfortable and sophisticated.
- The style keeps longer hair contained without heavy pinning.
- A soft elastic or satin tie can finish the look neatly.
- Perfect for workdays, travel, lunches, and casual dinners.
A low ponytail becomes much more interesting when the length is gathered into one relaxed braid. Instead of leaving the ponytail completely loose, braid the hair from the nape downward and stop before the final few inches to preserve some movement. This creates a tidy silhouette while allowing the natural silver pattern to remain visible throughout the length. It is particularly practical for longer hair that feels distracting when worn completely down. Stylists often recommend a low placement because it reduces pulling around the crown and makes the style comfortable for extended wear. This hairstyle can easily move from a busy workday to lunch, errands, travel, or an informal dinner.
For the smoothest result, brush the hair toward the nape without flattening the crown completely. Secure it with a soft elastic, then divide the ponytail into three even sections and braid downward. Keep your hands relaxed rather than pulling each crossing extremely tight; this helps the braid look fuller and reduces unnecessary tension. If your ends are dry, a tiny amount of lightweight hair oil can add shine without making the braid slippery. I’ve noticed that gently pulling outward on a few braid loops gives naturally gray hair more visible dimension. A satin scrunchie or understated tie at the base can finish the look while keeping the hairstyle secure.
Diagonal Crown Plait
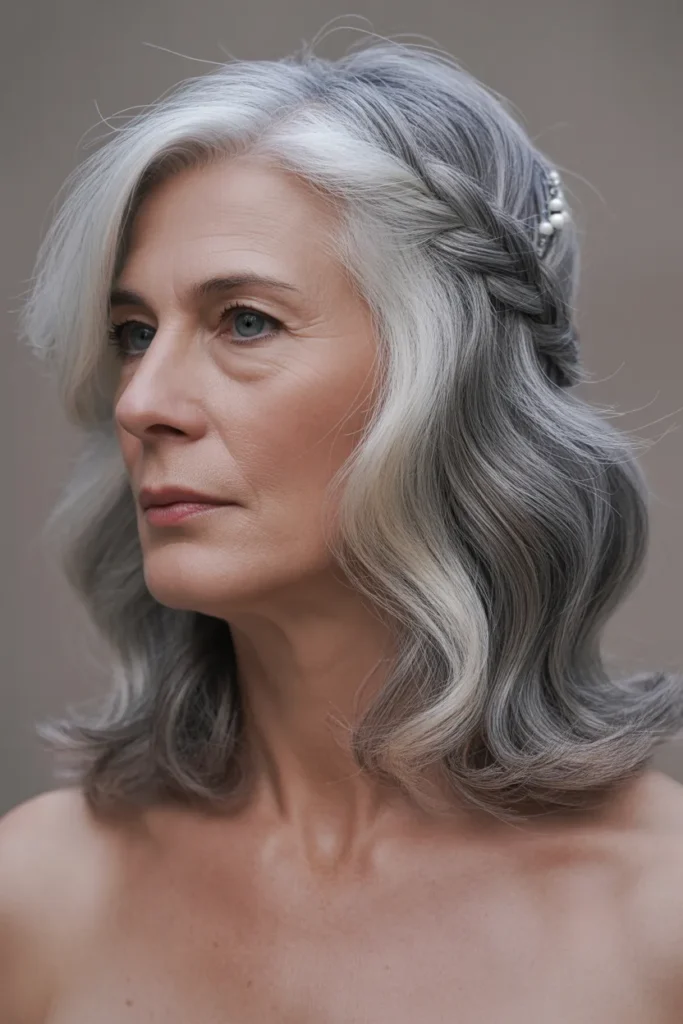
- The diagonal direction creates an unexpected visual line.
- Silver strands highlight each crossing of the braid.
- It gives medium-length hair a structured yet relaxed shape.
- The design can disguise uneven texture around the crown.
- Small sections can be loosened for added softness.
- Suitable for dinners, celebrations, and polished daytime looks.
A diagonal braid across the crown creates a graceful shape that feels different from the usual straight-across braid. Start near one temple and gradually work across the upper head toward the opposite side, keeping the braid close enough to follow the curve of the crown. The diagonal direction gives silver hair a dynamic flow and helps naturally contrasting strands catch the light from different angles. This is especially flattering for medium-length hair because the braid adds structure without requiring a full updo. In my experience, the most attractive finish comes from keeping the braid secure at its base while gently loosening selected sections afterward. It works beautifully for dinner dates, celebrations, photos, and polished daytime outfits.
The technique is easier when the hair has a little natural grip, so avoid applying heavy conditioner directly before styling. Part the starting section cleanly, divide it into three pieces, and add small amounts of hair as you move diagonally across the crown. Keep the tension steady but comfortable, particularly around the temples. Once the braid reaches the opposite side, secure it with a discreet pin underneath the surrounding hair. A few tiny pearl pins can emphasize the diagonal shape without making the style overly decorative. I’ve noticed that this method also works well when silver hair has different textures throughout the length because the braid visually connects those variations into one intentional design.
Braided Side Chignon
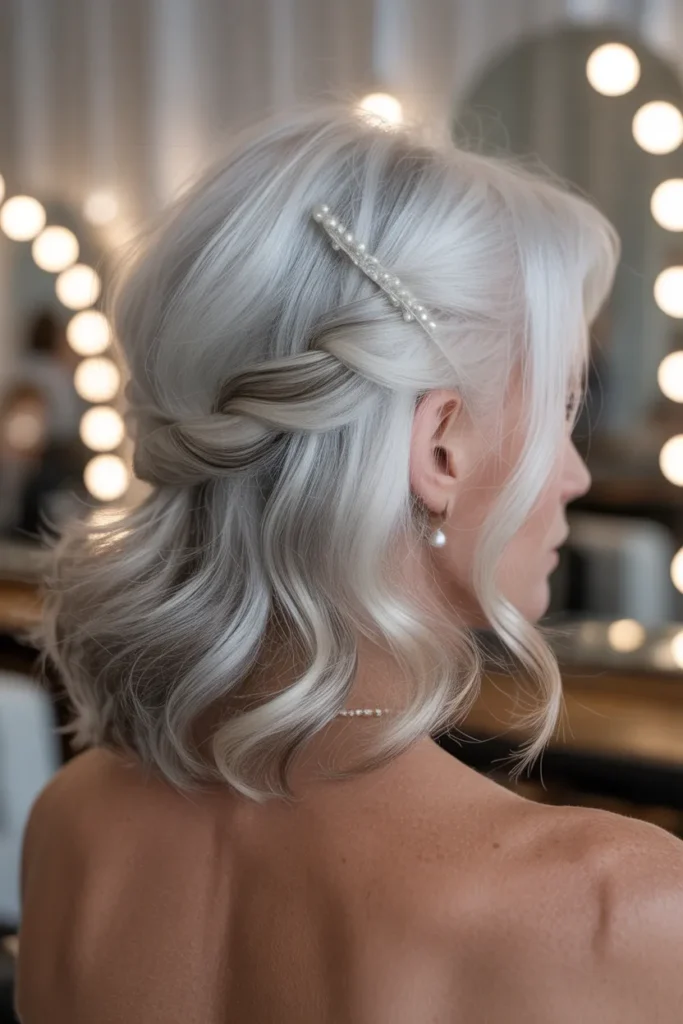
- The side placement creates an elegant asymmetrical silhouette.
- Braiding adds texture before the hair is pinned into the chignon.
- Silver and white strands make the woven detail more visible.
- A low position keeps the style comfortable for longer wear.
- Soft face-framing strands prevent the finish from feeling severe.
- Perfect for weddings, dinners, celebrations, and dressier occasions.
A braided side chignon gives silver hair an elegant shape while keeping the styling surprisingly practical. The braid begins from one side of the head, travels toward the lower nape, and is wrapped into a soft chignon positioned just behind the opposite ear. This creates an asymmetrical silhouette that looks polished from both the front and side. Natural white and silver strands become part of the design, adding dimension to every woven section. The style works especially well when you want your hair completely controlled for an occasion without making it look stiff. I’ve noticed that leaving two or three delicate strands near the face makes the finished chignon feel softer and more natural.
For a secure result, begin with lightly textured hair rather than freshly slippery strands. Create a side part, braid the heavier section toward the nape, and secure the end with a small elastic. Gather the remaining hair into the same area, twist everything gently, and wrap it into a low chignon. Use pins underneath instead of placing too many across the visible surface. If your hair contains different shades of gray, avoid excessive smoothing because the tonal variation helps define the braid. A few small pearl pins can add understated elegance for formal occasions. Stylists often recommend checking the style from the side before finishing, since the chignon should sit close to the head without pulling at the hairline.
Textured Fishtail Sweep
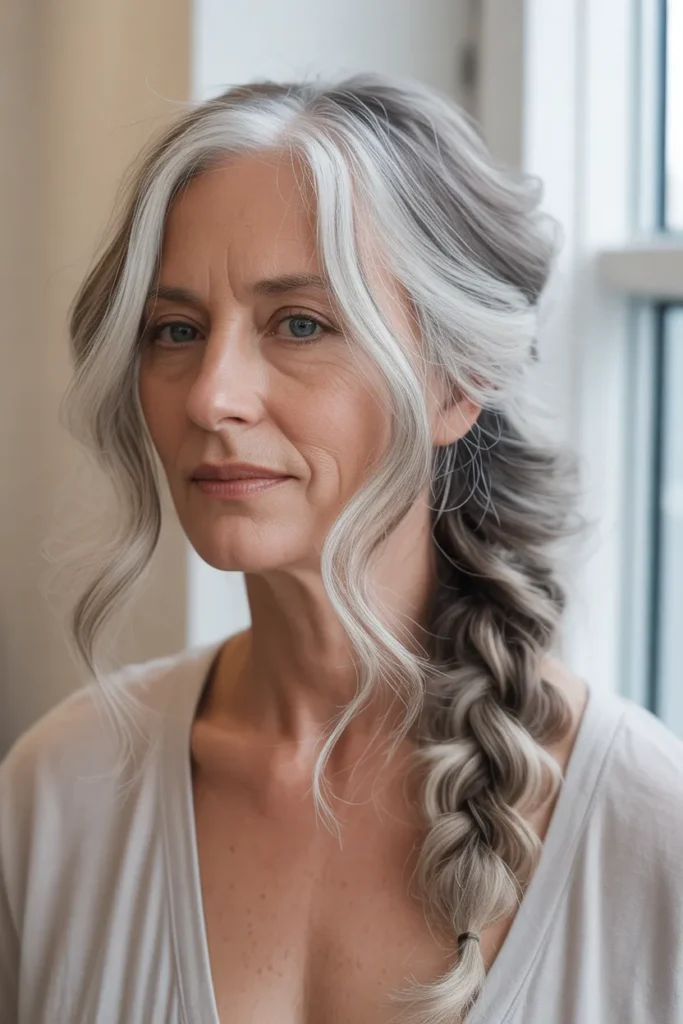
- The fishtail pattern creates fine, intricate texture.
- Side placement keeps the style relaxed rather than overly formal.
- Naturally mixed gray tones make the narrow weaving stand out.
- Gentle pulling through the braid creates a fuller appearance.
- Best suited to medium or long hair with some natural texture.
- Works for everyday wear as well as evening gatherings.
A loose fishtail braid can make naturally gray hair look beautifully textured without requiring complicated styling. Instead of using three equal sections, the fishtail technique takes smaller pieces from the outside of each side and crosses them toward the center. This creates a detailed woven pattern that becomes especially noticeable when silver and white strands are naturally mixed throughout the hair. Sweep the finished braid over one shoulder for a relaxed, balanced look that still feels polished. In my experience, fishtail braids look best when they are not pulled too tightly, because a slightly expanded shape allows the individual strands and tonal variations to remain visible. It is suitable for errands, lunches, travel, and casual evenings.
The trick to making this braid look fuller is to work with texture rather than fighting it. Add a small amount of lightweight texturizing spray through the lengths, then separate the hair into two larger sections. Take a thin strand from the outside of one section, cross it over, and repeat on the other side. Continue all the way down, keeping the tension even. Once secured, gently tug a few outer loops to widen the braid without disturbing its structure. I’ve noticed that this small finishing step makes a particularly noticeable difference on longer hair. Keep the ends natural or add a simple neutral tie for a clean finish that does not distract from the intricate pattern.
Braided French Roll
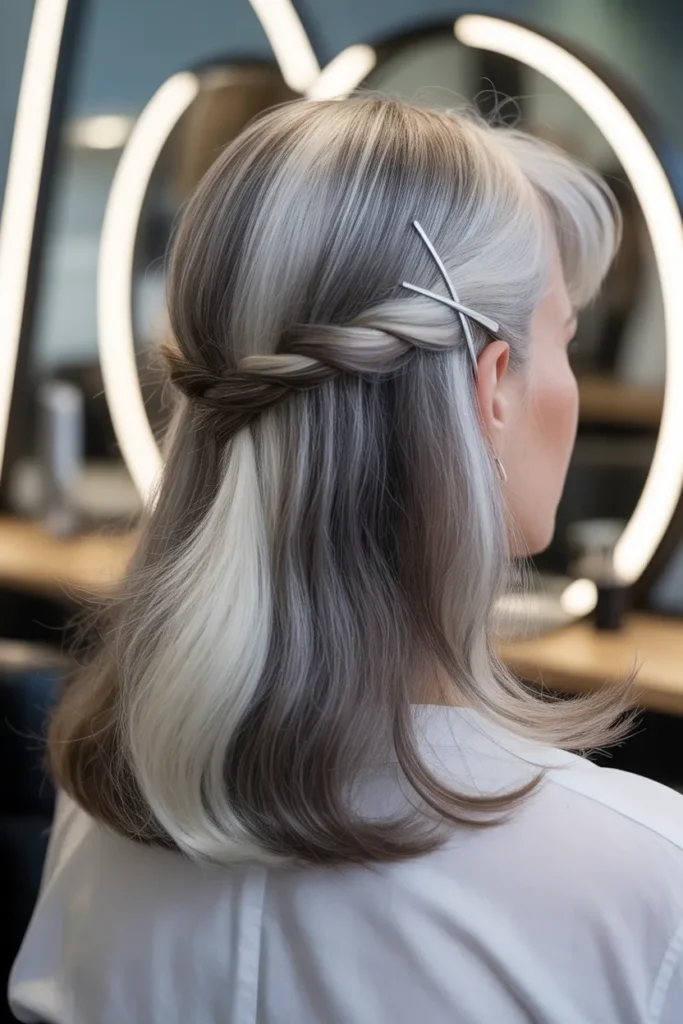
- A braided detail gives the classic roll a modern texture.
- The vertical shape works beautifully with medium-length hair.
- Silver strands create subtle contrast through the woven section.
- The style keeps the nape clean and comfortable.
- A few softened crown pieces add natural movement.
- Ideal for formal lunches, ceremonies, and evening occasions.
A braided French roll combines a familiar classic shape with a fresh woven detail that makes silver hair look especially refined. The hair is gathered vertically toward the back of the head, while one narrow section is braided before being incorporated into the roll. That small braid creates visible texture against the smooth shape of the twist and gives the hairstyle more visual interest from the side. This design is particularly useful for medium-length hair that may not have enough length for a large bun. Stylists often recommend keeping the crown softly lifted rather than completely flat, especially when the goal is an elegant but approachable finish. It works beautifully for ceremonies, formal lunches, dinners, and special events.
Start by creating a clean side or center part, depending on how you normally wear your hair. Separate a narrow section near the front, braid it loosely, and temporarily secure the end. Gather the remaining hair toward the back and twist it upward into a French-roll shape, securing it with several pins from underneath. Bring the small braid across the visible surface and tuck its end into the roll. Avoid using too much hairspray before pinning because overly stiff hair can become difficult to shape. I’ve noticed that a light smoothing cream applied only to the ends gives silver hair enough polish while preserving its natural texture. Finish with one understated silver pin for a sophisticated accent.
Crisscross Temple Braids
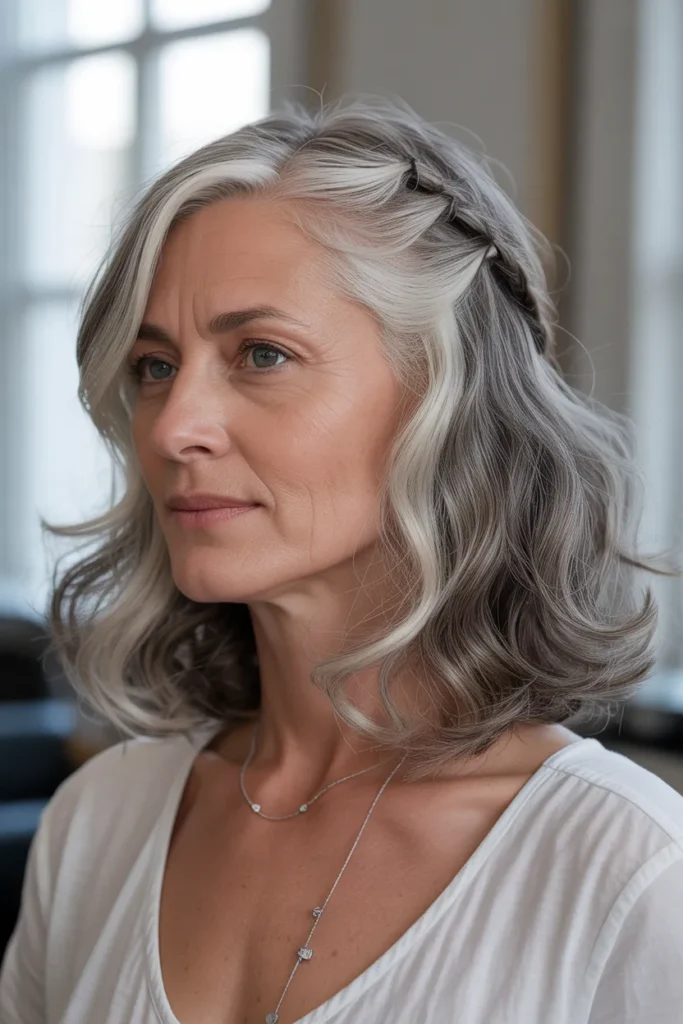
- Two slim braids create delicate detail along the temples.
- The crossing pattern adds visual interest without a full updo.
- Natural silver strands remain visible throughout the design.
- The rest of the hair can stay loose and touchable.
- Small pins keep the crossed sections comfortably secure.
- Ideal for everyday styling, lunches, and casual celebrations.
Two delicate temple braids can completely change the look of loose gray hair without taking away its natural movement. Begin with narrow sections near each temple, braid them backward, and cross them gently behind the crown before securing them beneath the surrounding hair. The result feels detailed from the front while keeping most of the length loose and touchable. Silver, white, and darker natural strands create subtle contrast inside each braid, making the crossed pattern easy to see. This is a particularly useful option when you want your hair away from your face but do not want a full updo. In my experience, the relaxed finish works beautifully for lunches, casual gatherings, and everyday polished styling.
The secret is keeping the temple sections small and the tension gentle. Separate each section cleanly, braid backward for several inches, and secure each end temporarily. Cross the braids at the back, then pin them underneath the loose hair so the fasteners remain hidden. A tiny amount of styling cream can smooth flyaways without making the silver strands look coated or flat. If your hair is naturally wavy, allow that texture to remain through the loose length rather than straightening everything first. I’ve noticed that this creates a pleasing contrast between the structured braids and flowing hair. A discreet silver pin can add a finished touch while keeping the overall appearance understated and comfortable.
Rope Braid Crown Bun
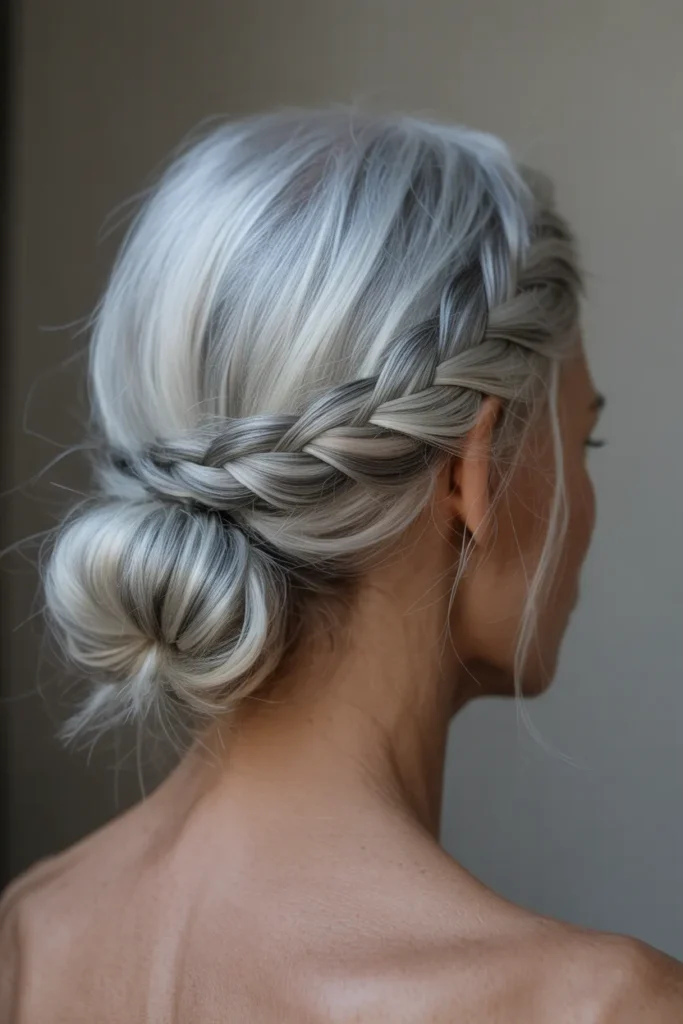
- A twisted rope braid gives the crown a rounded texture.
- The low bun keeps longer hair neatly contained.
- Silver and white strands emphasize the rope-like pattern.
- The design feels polished without looking overly structured.
- Gentle volume at the crown adds softness to the silhouette.
- Suitable for celebrations, dinners, and elegant daytime occasions.
A rope braid crown creates a graceful frame around the head before flowing into a simple low bun. Unlike a traditional three-strand braid, the rope effect comes from twisting two sections in the same direction and wrapping them together in the opposite direction. This creates a rounded, dimensional texture that looks especially striking through naturally silver hair. The crown portion can be kept moderately loose so the hairstyle feels soft rather than tightly sculpted. It is a practical choice for longer hair when you want everything contained but still want an interesting silhouette. Stylists often recommend this technique for special occasions because the twisted texture photographs beautifully without requiring elaborate accessories.
For the cleanest result, divide the hair near the crown and create two manageable sections. Twist each section consistently, then cross them together in the opposite direction to prevent the rope from unraveling. Continue around the head and secure the braid near the opposite side. Gather the remaining length into a low bun and pin it from underneath. If your silver hair is fine, gently pull the outer edges of the rope braid to create more visible volume. I’ve noticed that keeping the bun slightly relaxed makes the whole style feel more modern. A simple silver clasp near the bun can provide a subtle finishing detail while allowing the natural gray tones to remain the focus.
Braided Waterfall Tuck
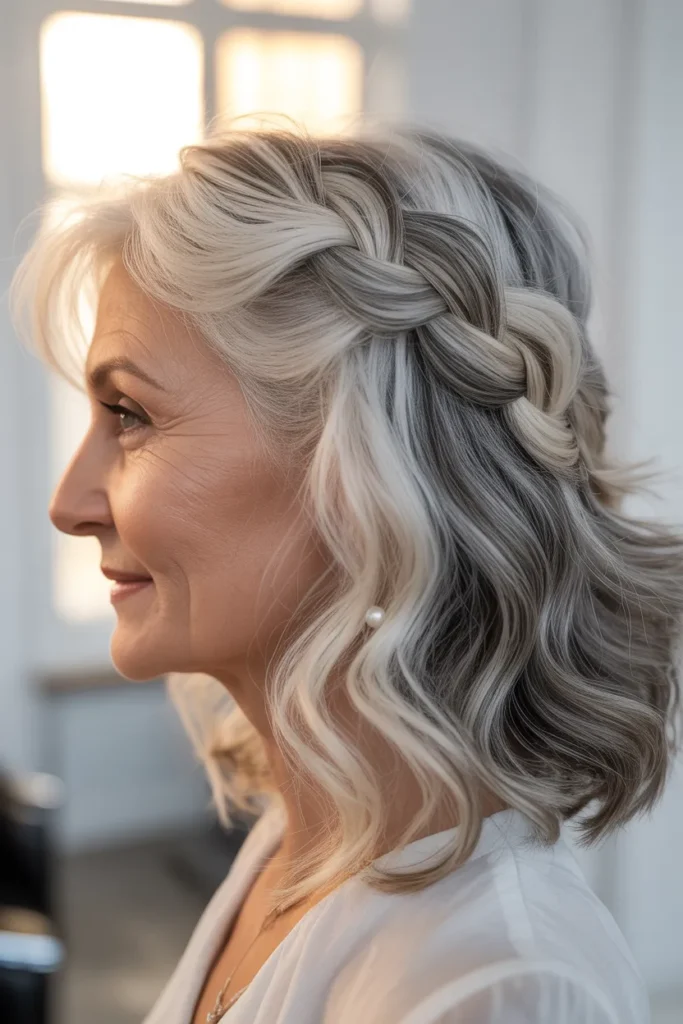
- Cascading sections create movement while keeping the front controlled.
- The tucked braid gives the loose style a polished finish.
- Mixed gray tones add depth to every falling strand.
- The technique works especially well on wavy or lightly textured hair.
- It keeps the hairstyle soft instead of heavily pinned.
- Great for daytime celebrations, photos, and relaxed evening events.
A waterfall braid offers a beautiful way to add structure while allowing selected lengths to fall naturally through the woven pattern. The braid travels diagonally across the upper side of the head, releasing small sections as it moves before finishing in a discreet tuck near the opposite side. Those cascading strands create gentle movement and help showcase the natural mixture of silver, white, and darker tones. This design is particularly lovely on shoulder-length or longer wavy hair because the released sections blend naturally into the rest of the hairstyle. In my experience, it gives the impression of careful styling without looking overly constructed, making it a versatile choice for daytime celebrations, photographs, and relaxed evening occasions.
Start with slightly textured hair so the released sections have enough grip to stay in place. Take a section near the front, divide it into three pieces, and begin a loose waterfall braid across the head. Each time you cross the upper section, release the lower piece and replace it with a new section from underneath. Keep the braid close to the head but avoid pulling tightly around the temples. Once you reach the opposite side, secure the braid underneath the loose hair with a small pin. A tiny pearl accessory can disguise the fastening point while adding subtle detail. I’ve noticed that gently shaping the released waves afterward helps the entire style look cohesive rather than overly separated.
Braided Sides Bun
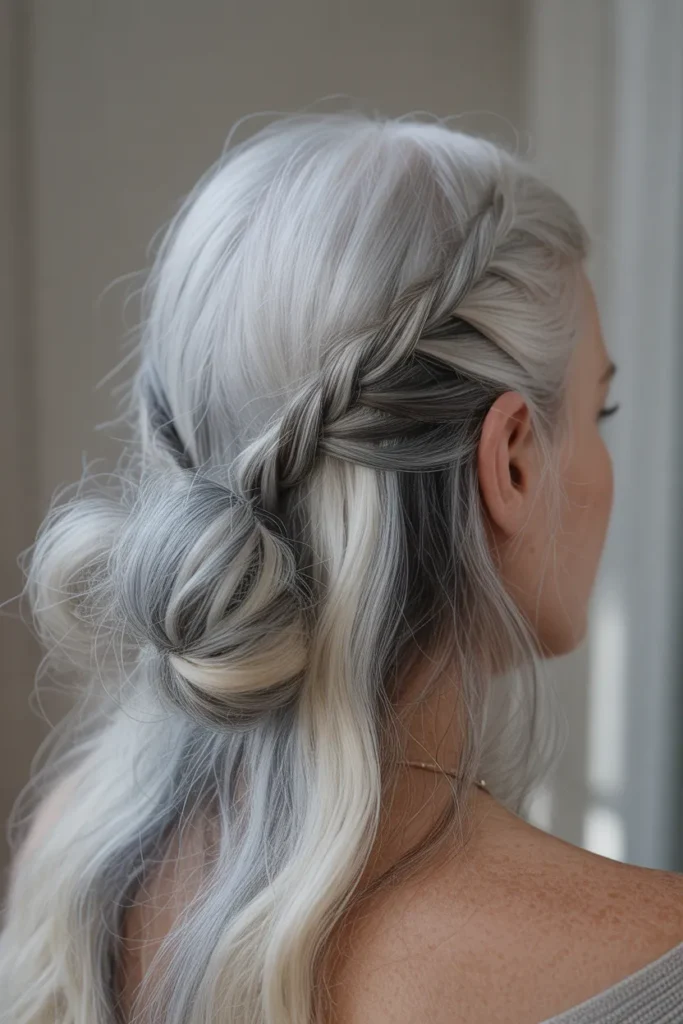
- Slim side braids add structure without overwhelming the hairstyle.
- The low bun keeps longer hair neatly contained.
- Silver and white strands emphasize the woven sections.
- A softly lifted crown creates a balanced silhouette.
- The style stays comfortable for extended wear.
- Ideal for dinners, celebrations, ceremonies, and polished gatherings.
A low bun becomes far more distinctive when two slim braids frame the sides before joining at the back. Start with narrow sections above each ear, braid them toward the nape, and gather the remaining length into a softly textured bun. The side braids create clean lines while the bun keeps the overall shape relaxed and wearable. Natural silver and white strands catch the light along each woven section, adding dimension without needing additional color. This design works especially well for medium-to-long hair when you want a secure style that still feels soft. I’ve noticed that keeping the crown slightly lifted makes the silhouette look balanced rather than overly flat or formal.
For a comfortable finish, separate the side sections evenly and avoid pulling them tightly around the ears. Braid each section loosely, then secure the ends temporarily while you gather the remaining hair at the nape. Twist the length into a low bun and tuck the braid ends underneath before adding pins from below. If your hair has natural waves, let them remain visible through the bun instead of smoothing every strand. A lightweight finishing cream can control flyaways while preserving texture. Stylists often recommend placing pins in a crisscross pattern for better support, especially when the hair is longer or heavier. Finish with a small metallic pin for understated detail at a formal event.
Looped Silver Plait
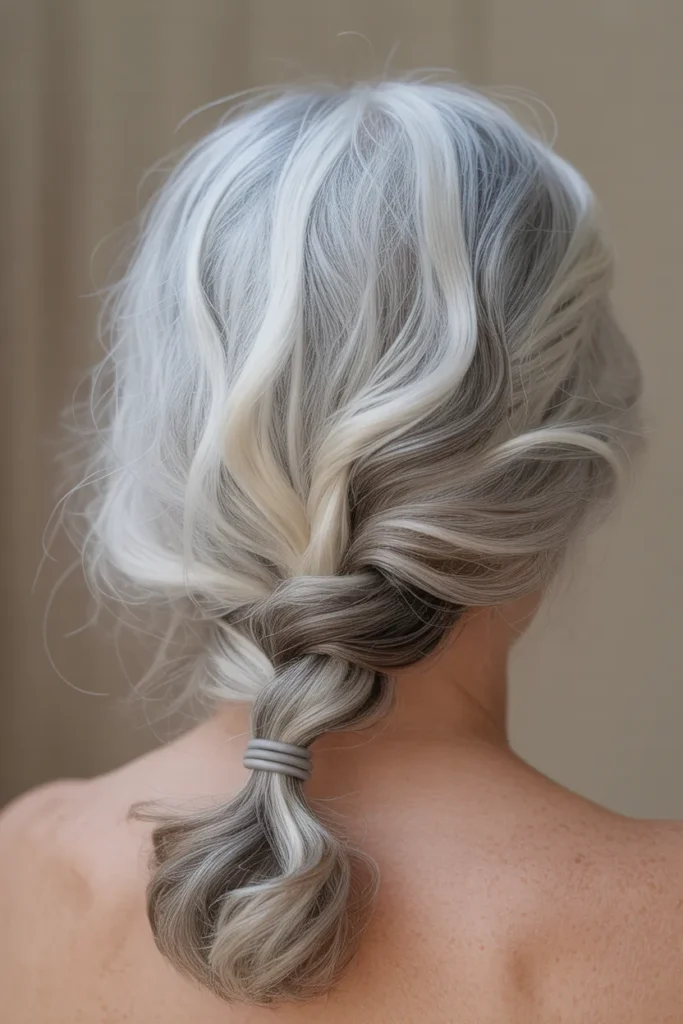
- Repeated loops give the braid a distinctive dimensional appearance.
- The low placement keeps the style practical and comfortable.
- Mixed silver shades create natural contrast between each loop.
- A slightly expanded finish makes the braid appear fuller.
- It works well for longer straight or softly wavy hair.
- Suitable for everyday wear, travel, lunches, and casual events.
A looped braid gives long gray hair an artistic texture while remaining surprisingly simple to wear. Instead of keeping every section tightly compressed, the braid is gently expanded after each crossing to create rounded loops along the length. This makes the woven pattern more noticeable and allows silver and white strands to reflect light individually. The braid sits low behind the head or over one shoulder, depending on how you prefer to wear your length. This approach works particularly well when ordinary braids feel too flat or predictable. In my experience, the slightly opened loops also make longer hair look more dimensional without adding complicated accessories or excessive styling products.
Begin with a low ponytail or simply gather the hair at the nape, depending on the finish you prefer. Divide the length into three sections and braid normally, keeping the tension consistent. After securing each completed section, gently pull the outer edges sideways to create soft loops. Work gradually rather than tugging strongly, especially if your hair is fine or delicate. A small amount of dry texture spray can improve grip before you begin. I’ve noticed that silver hair often benefits from this technique because the expanded braid allows different tones to remain visible instead of compressing them into one narrow line. Finish with a matte silver tie that blends naturally into the cool tones.
Braided Crescent Updo
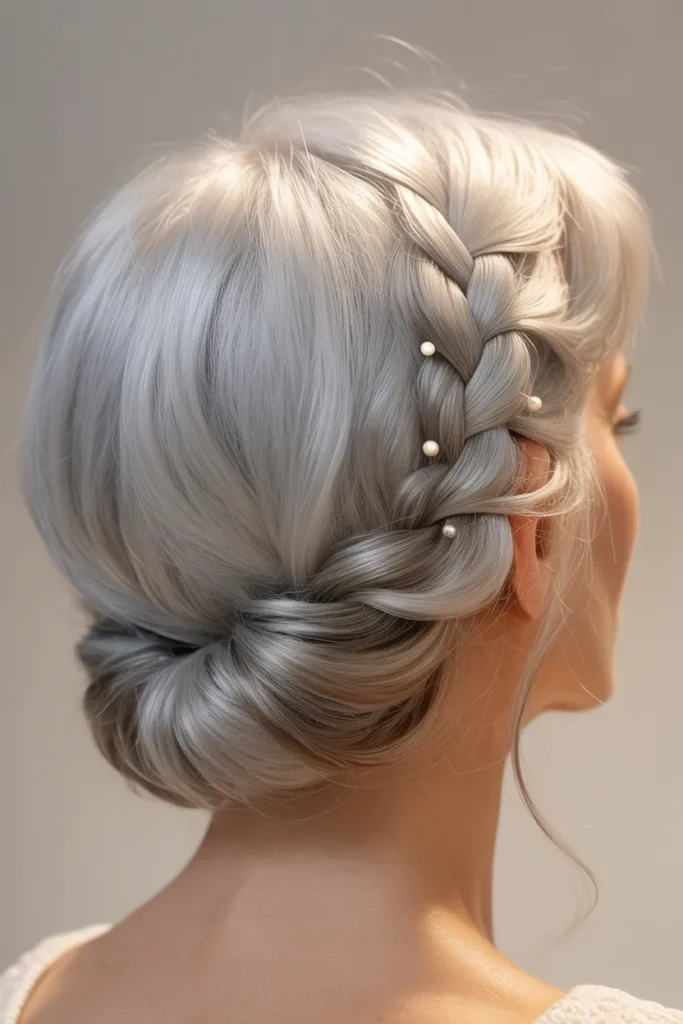
- The curved braid creates a distinctive crescent-shaped silhouette.
- The raised placement gives medium-length hair elegant structure.
- Silver strands highlight the curved woven detail.
- A soft tucked finish keeps the nape polished.
- Gentle crown volume prevents the style from appearing too severe.
- Beautiful for receptions, dinners, celebrations, and formal daytime occasions.
A curved crescent braid creates an elegant updo with a shape that feels fresh and distinctive. The braid follows a gentle arc across the back of the head rather than traveling in a straight line, then disappears into a tucked section near the opposite side. This curved movement gives medium-length hair a graceful silhouette while allowing natural silver tones to remain visible throughout the braid. The style is especially useful when you want an elevated look without committing to a large or heavily structured updo. I’ve noticed that a little volume around the crown helps balance the curved shape and keeps the finished style looking soft. It is ideal for receptions, dinners, celebrations, and formal daytime occasions.
To create the shape, begin with a deep side section and divide a moderate amount of hair near the heavier side. Braid across the back while gradually following the natural curve of the head, adding small sections as you move. Once you reach the opposite side, tuck the remaining end underneath the braided area and secure it with pins. Keep the braid comfortably snug but avoid excessive tension around the temples and crown. A few loosened strands can soften the edges and make the style more natural. Stylists often recommend checking the curve from behind before applying finishing spray because the arc should look intentional without becoming too rigid. Tiny pearl pins can discreetly secure the tucked section for an elegant finish.
Conclusion
The right braid can turn naturally gray hair into a beautiful feature rather than something you feel you need to disguise. These braided hairstyles for gray hair over 50 offer plenty of ways to add texture, movement, polish, and personality while keeping your natural silver tones visible. Whether you prefer a relaxed side braid, an elegant updo, or a creative woven detail, there is inspiration here for everyday styling and special occasions alike. I’ve seen how a thoughtful hairstyle can transform the overall look and make getting ready feel more enjoyable. Choose one idea that catches your eye, adapt it to your hair’s natural texture, and give it a try. Save this post on Pinterest, share it with someone looking for fresh inspiration, and enjoy discovering a braid that feels uniquely yours.